🚀Day 15- Jenkins Advanced: A Comprehensive Guide
🎉 Hello There!!! I am Mohd Ishtikhar Khan, a skilled Cloud & DevOps engineer, having experience in automating various aspects of software development and deployment, including code integration, testing, and deployment processes and Planning and designing the cloud infrastructure in AWS.
⭐️ I thrive in bridging the gap between development and operations teams, with the goal of automating and streamlining the software development and deployment process. As Cloud and DevOps Engineers, we work to improve the speed, efficiency, and quality of software delivery, making it possible to release code faster and more reliably.
Experience in Designing and deploying dynamically scalable, available, fault-tolerant, and reliable applications on the Cloud. Maintenance and support of cloud infrastructure.Implementing cost-control strategies and Troubleshooting and resolving issues with the cloud infrastructure.
Experience in designing solutions that will help customers migrate, operate, deploy, optimize, and execute the DevOps vision of a project and also have a strong passion for technology exploration and development.
I believe that I am somebody with a very strong work ethic because I thrive in challenging environments and I also love building relationships and going out of the way to help a client.
🤝Let's connect! If you're looking to discuss DevOps fundamentals or if you want to share your experience, feel free to reach out to me at mohdishtikhar1786@gmail.com.

Jenkins Components and Terminology
Master:
The Jenkins master is the central server that manages and coordinates the automation process.
It schedules and monitors jobs, communicates with agents (slaves), and provides a web-based user interface for configuration and monitoring.
Node/Agent/Slave:
Nodes, agents, or slaves are machines that execute tasks as directed by the Jenkins master.
Agents can be set up on different machines to distribute workload and run jobs concurrently.
Agents communicate with the master to request and execute jobs.
Job:
A job in Jenkins is a single task or unit of work, typically representing a build, test, or deployment process.
Jobs are created to automate different aspects of the development lifecycle.
Jobs can be configured with build scripts, source code repositories, and post-build actions.
Build:
A build is a process of compiling source code, running tests, and generating executable artifacts.
Jenkins automates the build process, ensuring that code changes are continuously integrated and tested.
Workspace:
- Each Jenkins job has its own workspace, which is a directory on the file system where the job's code and build artifacts are stored during execution.
Pipeline:
A pipeline in Jenkins is a series of automated steps that define the continuous delivery process.
Jenkins Pipeline is defined using a domain-specific language (DSL) or through a visual editor.
Pipelines allow the modelling and visualization of complex workflows.
Jenkinsfile:
- A Jenkinsfile is a text file that contains the definition of a pipeline using a domain-specific language. It's like a script that tells Jenkins what to do at each step of the pipeline.
SCM (Source Code Management):
Jenkins integrates with various source code management systems, including Git, Subversion, and others.
SCM configurations are used to specify the source code repository and define when Jenkins should trigger a build.
Plugin:
Jenkins plugins are extensions that provide additional functionality or integrations.
Plugins can be installed to support various source control systems, build tools, deployment platforms, and more.
Executor:
An executor is a slot for running a job on a node.
Each node can have one or more executors, allowing multiple jobs to run concurrently on the same node.
Artifact:
An artifact is a compiled or packaged output produced by a build job.
Artifacts can include binaries, libraries, documentation, or any other files generated during the build process.
Freestyle Project:
A freestyle project is a traditional Jenkins job that is configured through a graphical user interface.
It allows users to define build steps, post-build actions, and other settings visually.
Matrix Project:
A matrix project is a Jenkins job that allows you to run a job on multiple configurations in parallel.
Useful for testing a project across different environments or configurations.
What are the different ways to trigger Jenkins pipelines?
Jenkins pipelines can be triggered in various ways to automate the continuous integration and delivery process. Here are some common methods to trigger Jenkins pipelines:
Manual Trigger:
Users can manually trigger a pipeline through the Jenkins web interface.
This is useful when a user wants to initiate a build or deployment manually.
Scheduled Trigger (Poll SCM):
Jenkins can be configured to poll the source code repository at specified intervals.
If changes are detected in the repository, the pipeline is triggered automatically.
This is known as "polling SCM" or scheduled polling.
Webhooks:
Many version control systems, such as Git and GitHub, support webhooks.
Webhooks are HTTP callbacks that notify Jenkins of changes in the repository.
When a change occurs, the webhook triggers the Jenkins pipeline.
GitHub/Bitbucket/GitLab Hooks:
Jenkins can integrate with version control systems like GitHub, Bitbucket, and GitLab.
Post-commit hooks or webhooks in these systems can trigger Jenkins when code is pushed or changes are made.
Jenkins Job Trigger:
One Jenkins job can trigger another as part of a larger workflow.
This allows for the creation of complex build and deployment pipelines with multiple interconnected jobs.
Upstream/Downstream Projects:
Jenkins supports the concept of upstream and downstream projects.
An upstream project triggers downstream projects upon successful completion.
This is useful for creating dependencies between different jobs or pipelines.
Parameterized Builds:
Pipelines can be parameterized, allowing users to provide input when triggering a build.
Parameters can be used to customize the behaviour of the pipeline or provide version numbers, credentials, or other dynamic information.
Pipeline DSL (Jenkinsfile):
Jenkins pipelines can be defined using a Jenkinsfile, which is a Groovy-based DSL (Domain-Specific Language).
Changes to the Jenkinsfile in the source code repository can trigger pipeline execution.
Jenkins can be configured to detect changes in the Jenkinsfile and initiate a build accordingly.
Git Branches:
Jenkins can be configured to trigger pipelines based on changes in specific branches of the source code repository.
For example, a pipeline might be triggered only when changes are pushed to the
developormasterbranch.
Build Trigger from External Systems:
External systems, such as build orchestration tools, continuous integration services, or custom scripts, can trigger Jenkins pipelines through its API.
This allows for integration with a broader ecosystem of tools.
SCM Hooks (e.g., Git Hooks):
Git hooks on the client side can be used to trigger Jenkins pipelines.
For example, a post-commit hook can be set up to notify Jenkins when a commit is made.
Choose the trigger method or combination of methods that best suits your workflow and requirements. The flexibility of Jenkins allows for integration with various tools and systems, enabling automation at different stages of the software development lifecycle.
What is Jenkins Pipeline?
A pipeline is a collection of events or jobs which are interlinked with one another in a sequence. It is a suite of plugins that supports the integration & implementation of continuous delivery pipelines into Jenkins.
In other words, a Jenkins pipeline is a collection of jobs or events that brings the software from version control into the hands of the end-user by using the automation tool. it is used to incorporate continuous delivery in our software development workflow.
A pipeline has an extensible automation server for creating simple or even complex delivery pipelines "as code" vis DSL (Domain Specific Languages)
It's used in Jenkins to define and automate the building, testing, and deployment of software applications or any other processes. Pipelines can be created using different approaches, such as declarative and scripted.
What is a Continuous Delivery Pipeline
A continuous delivery pipeline is a series of automated processes for delivering new software. It's an implementation of the continuous paradigm, where automated builds, tests, and deployments are orchestrated as one release workflow.
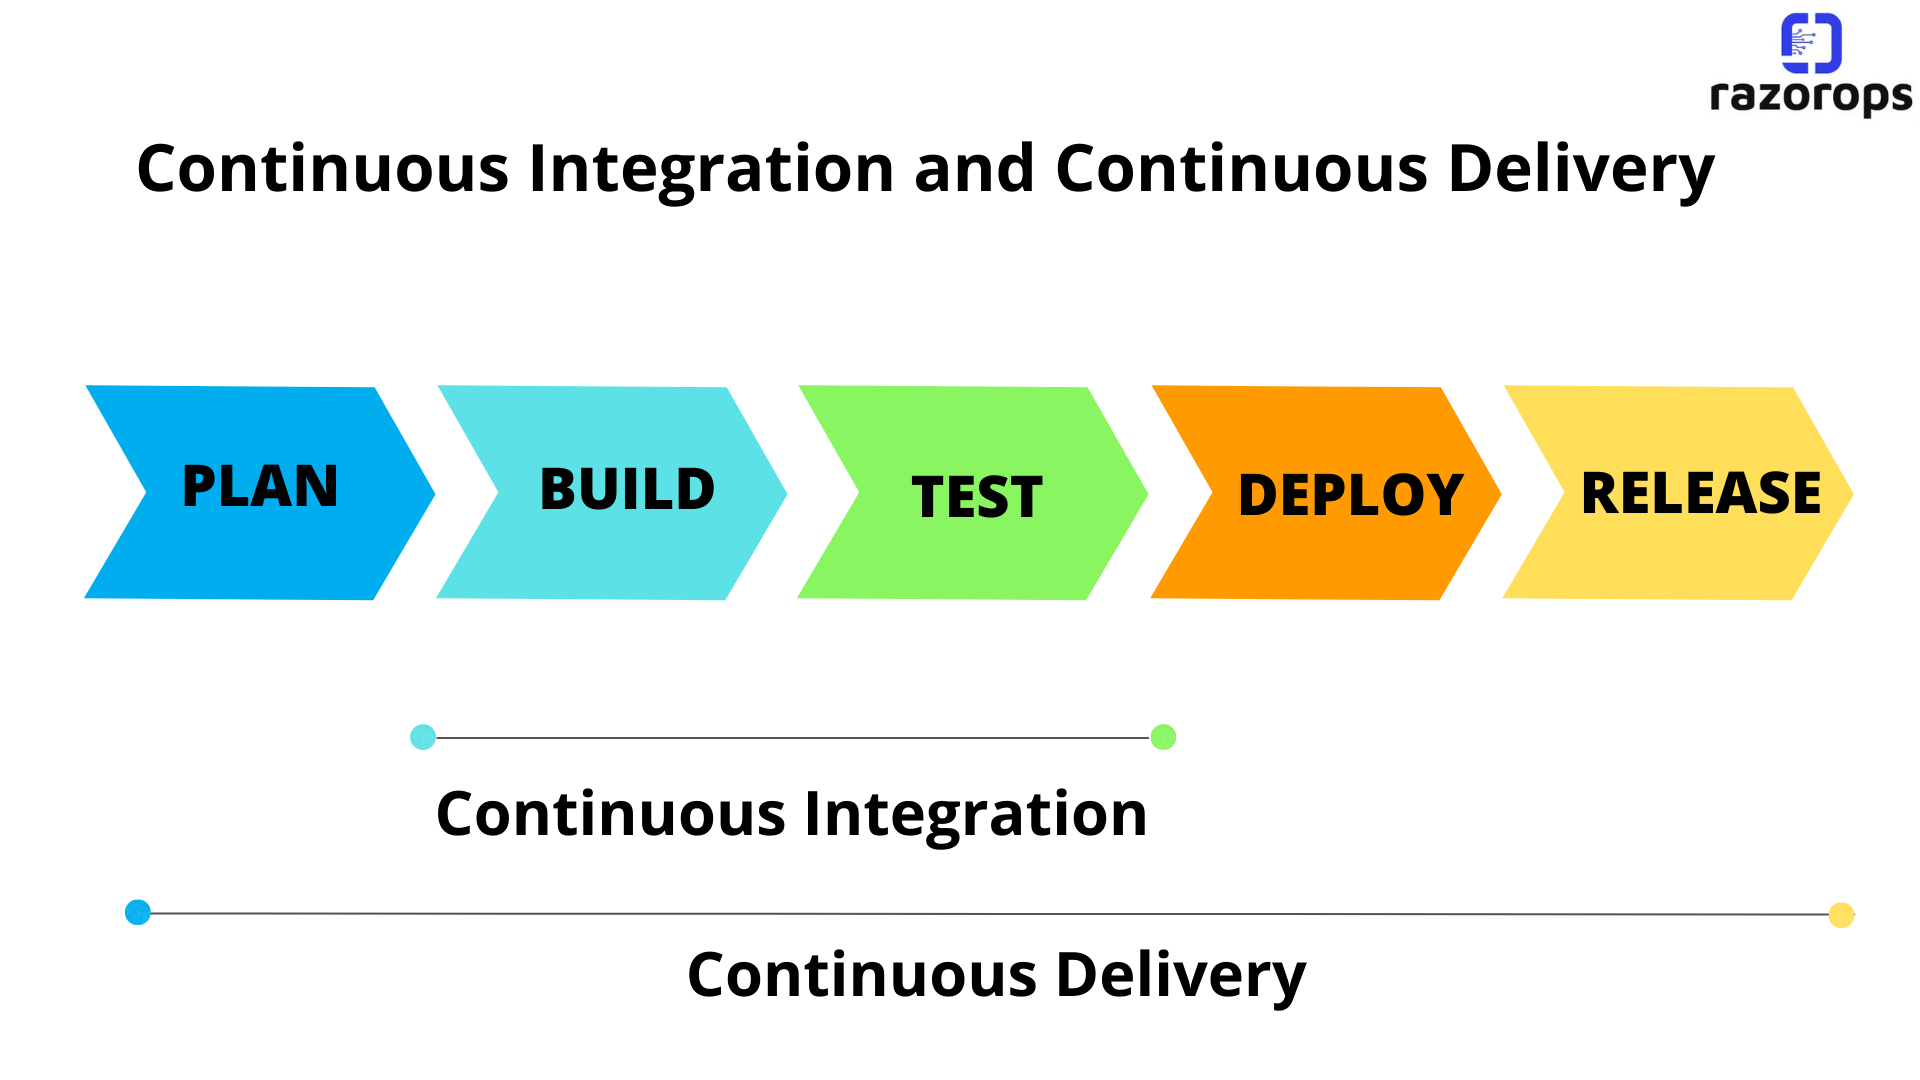
The above diagram represents a continuous delivery pipeline in Jenkins. It contains a collection of states such as Plan, Build, Test, Deploy & Release. These jobs or events are interlinked with each other every state has its jobs which work in a sequence called a Continuous Delivery Pipeline.
Types of Jenkins Pipeline
Jenkins supports two primary types of pipelines: Scripted Pipelines and Declarative Pipelines. Both types use a domain-specific language (DSL) based on Groovy, but they differ in their syntax and approach to defining the pipeline structure. Here's an overview of each:
1. Scripted Pipeline
Key Features:
Freeform Syntax: Scripted Pipelines provide a more flexible and freeform syntax. You have full control over the flow of the pipeline, using Groovy scripting to define stages and steps.
Scripted Logic: Allows the use of loops, conditions, and custom functions to control the execution flow.
Procedural Approach: Scripted Pipelines follow a more procedural approach to defining the pipeline.
Use Cases:
Suited for users who prefer a more flexible and programmable approach.
Well-suited for complex workflows that may require advanced logic and dynamic behavior.
Syntax:
node {
    stage('Build') {
        // Build stage steps
    }
    stage('Test') {
        // Test stage steps
    }
    stage('Deploy') {
        // Deployment stage steps
    }
}
2. Declarative Pipeline
Key Features:
Structured Syntax: Declarative Pipelines provide a more structured and opinionated syntax. It is designed to be simpler and more readable.
Declarative Logic: Focuses on describing the desired state of the pipeline rather than specifying every detail of the execution.
Less Boilerplate: Requires less boilerplate code compared to Scripted Pipelines.
Use Cases:
Suited for users who prefer a simpler and more human-readable syntax.
Recommended for straightforward build and deployment processes where a more structured approach is sufficient.
Syntax:
pipeline {
    agent any
    stages {
        stage('Build') {
            steps {
                // Build stage steps
            }
        }
        stage('Test') {
            steps {
                // Test stage steps
            }
        }
        stage('Deploy') {
            steps {
                // Deployment stage steps
            }
        }
    }
}
Scripted vs Declarative: Scripted Pipelines offer more flexibility but can be more complex. Declarative Pipelines provide a simpler syntax for common use cases.
Pipeline Shared Libraries: Regardless of whether you choose Scripted or Declarative Pipelines, both types can benefit from the use of shared libraries. Shared libraries allow you to reuse code across multiple pipelines, enhancing maintainability and promoting best practices.
Additional Pipeline Types: Jenkins also supports other pipeline types, such as Multibranch Pipelines and Pipeline Templates, which provide additional features and customization options. Multibranch Pipelines are used for managing branches in version control systems, while Pipeline Templates allow you to define reusable pipeline templates for specific use cases.
What is Jenkinsfile?
A Jenkinsfile is a text file that defines the structure and steps of a Jenkins Pipeline. It is typically stored in the version control system along with the source code of the project. You can implement the pipeline as code using Jenkinsfile & this can be defined by using a DSL (Domain Specific Language).
Benefits of using Jenkinsfile
you can make pipelines automatically for all branches & execute pull requests with just one Jenkinsfile.
you can review your code on the pipeline
you can review your Jenkins pipeline
This is a singular source for the pipeline & can be customized by users
Jenkinsfile can be defined by using either Web GUI or with a Jenkinsfile
Why You Should Have a Pipeline
Using Jenkins Pipeline offers several advantages for teams engaged in continuous integration and continuous delivery (CI/CD) processes. Here are some key reasons why Jenkins Pipeline is widely used:
End-to-End Automation:
Jenkins Pipeline allows you to automate the entire software delivery process, from building and testing to deploying and releasing.
It provides a centralized and programmable way to define, manage, and visualize complex workflows.
Pipeline as Code:
Jenkins Pipeline follows the "Pipeline as Code" paradigm, allowing you to define and version your CI/CD process as code.
This approach enables teams to treat their delivery process as a first-class citizen, providing benefits such as versioning, code review, and collaboration.
Version Control Integration:
Jenkins Pipeline integrates seamlessly with version control systems (e.g., Git), allowing the Jenkinsfile to be versioned along with the source code.
Changes to the Jenkinsfile can be tracked, audited, and reviewed, providing transparency and accountability.
Reproducibility:
The Jenkinsfile specifies the entire pipeline, making builds and deployments reproducible.
This ensures that the same set of steps is executed consistently, reducing the risk of variations across different environments.
Consistency Across Environments:
Jenkins Pipeline allows you to define a consistent and repeatable process that can be executed across different environments (e.g., development, testing, production).
This consistency reduces the likelihood of errors caused by differences in environments.
Pipeline Visualization:
Jenkins provides a visual representation of the pipeline based on the Jenkinsfile.
The visualization allows teams to monitor and understand the progression of stages and steps, making it easier to troubleshoot and optimize the pipeline.
Modularization and Reusability:
Jenkins Pipeline supports modularization through shared libraries and reusable components.
Shared libraries enable the encapsulation of common pipeline logic, promoting code reuse and maintainability.
Flexibility and Parameterization:
Jenkins Pipeline supports parameterization, allowing users to customize pipeline behavior based on different criteria.
This flexibility is useful for handling variations in build configurations, deployment targets, or other parameters.
Integration with Tools and Services:
Jenkins Pipeline integrates with a wide range of tools and services through plugins.
You can seamlessly integrate with version control systems, build tools, testing frameworks, container orchestration platforms, and more.
Parallel Execution:
Jenkins Pipeline allows for parallel execution of stages and steps, making it possible to optimize build times.
Parallelization is especially valuable for projects with multiple and independent components.
Ease of Maintenance:
Jenkinsfile provides a structured and readable way to define pipelines.
It is easier to understand, maintain, and modify compared to traditional web-based configurations, contributing to improved maintainability.
Continuous Integration and Continuous Delivery:
- Jenkins Pipeline is designed specifically for continuous integration and continuous delivery, supporting best practices for agile development and DevOps
Jenkins Pipeline Concepts
Jenkins Pipeline introduces several key concepts that are essential for understanding and working with the continuous integration and continuous delivery (CI/CD) process. Here are some fundamental concepts associated with Jenkins Pipeline:
Pipeline:
A pipeline in Jenkins is a series of automated steps that define the entire build, test, and deployment process.
Pipelines can be written using the declarative or scripted syntax, both based on Groovy.
Node:
A node represents an environment in which Jenkins runs the pipeline.
It could be the Jenkins master or a separate agent/slave machine where stages and steps are executed.
Stage:
A stage is a logical unit within a pipeline that represents a phase in the CI/CD process.
Examples of stages include "Build," "Test," "Deploy," and "Cleanup."
Step:
A step is a single task within a stage, representing an individual action in the pipeline.
Steps can include operations like compiling code, running tests, deploying artifacts, and more.
Agent:
An agent (or slave) is a machine where the steps of a pipeline are executed.
Agents can be specified at the pipeline or stage level, allowing flexibility in distributing workloads.
Jenkinsfile:
The Jenkinsfile is a Groovy script that defines the entire pipeline as code.
It can be stored in the version control system, allowing versioning and collaboration on the CI/CD process.
Declarative Pipeline:
Declarative Pipeline is a simplified and opinionated syntax for defining pipelines.
It provides a structured and human-readable way to describe the desired state of the pipeline.
Scripted Pipeline:
Scripted Pipeline is a more flexible and freeform syntax for defining pipelines.
It allows the use of Groovy scripting to provide a more complex and dynamic control flow.
Pipeline Syntax:
Pipeline syntax includes a set of DSL (Domain-Specific Language) elements used to define and control the flow of a pipeline.
It includes constructs for stages, steps, environment variables, parameters, and more.
Parallel Execution:
Jenkins Pipeline supports the parallel execution of stages and steps.
This feature allows for more efficient use of resources and faster completion of the pipeline.
Shared Libraries:
Shared libraries allow the modularization and reuse of code across multiple pipelines.
They provide a way to encapsulate common functions and logic, promoting maintainability and best practices.
Workspace:
- Each pipeline run has its own workspace, which is a directory on the file system where the code and build artifacts are stored during execution.
Parameters:
Pipelines can be parameterized, allowing users to provide input when triggering a build.
Parameters can be used to customize the behavior of the pipeline dynamically.
Post Actions:
Post actions define steps that run after the main execution of a pipeline.
Common post actions include notifications, cleanup tasks, or publishing reports.
Environment Variables:
Environment variables can be defined and used within the pipeline to store and access configuration values.
They provide a way to handle sensitive information and configuration settings.
Understanding these pipeline concepts is crucial for effectively defining, managing, and maintaining Jenkins Pipelines. They provide the building blocks for creating flexible, automated, and reproducible CI/CD processes.
Pipeline Project 1:
Create a Jenkins Declarative Pipeline
Step 1 :
Log in to your Jenkins dashboard.
Click on "New Item" in the top-left corner.
Enter a name for your project. Let's call it "Demo-pipeline"
Select "Pipeline" and click "OK."

Step 2:
Configure the Pipeline
In the pipeline configuration, scroll down to the "Pipeline" section.
Select the "Pipeline script" option.
add the script.
Here's the code:
pipeline {
    agent any
        stages{
        stage("Build"){
            steps{
                echo "This is build stage"
            }
        }
        stage("Test"){
            steps{
                echo "This is test stage"
            }
        }
        stage("Deploy"){
            steps{
            echo "This is Deploy Stage"
        }
        }
        stage("Release"){
            steps {
                echo "This is release stage"
            }
        }

    }
    post {
        success {
            echo 'your pipeline executed successfully'
        }
    }
}
Step 3:
Once the project is created, click on Save and Build Now to run the project.

Step 4:
Check the console output for the message.

This example creates a simple Declarative Pipeline job that build, test, deploy and release simple application. Declarative Pipelines provide a structured and easy-to-read way to define your CI/CD processes in Jenkins.
Pipeline Project 2:
Create a Jenkins Declarative Pipeline for dockerize nodejs application
Step 1 :
Log in to your Jenkins dashboard.
Click on "New Item" in the top-left corner.
Enter a name for your project.
Select "Pipeline" and click "OK."
Step 2:
Configure the Pipeline
In the pipeline configuration, scroll down to the "Pipeline" section.
Select the "Pipeline script" option.
add the script.
Here's the code:
pipeline{
    agent any
    stages{
        stage("Code Clone"){
            steps{
                git url: "https://github.com/ishtikhar-github/NodeApp-CICD.git", branch: "master"
                echo "code clone done"
            }
        }
        stage("Code Copy & Build"){
            steps{
             sh "sudo cp -r . /home/ubuntu/nodeapp"
             sh "docker build -t nodeapp-test ."
             echo " Code Copied and Build"
            }
        }
        stage("Code Push"){
            steps{
                    withCredentials([usernamePassword(credentialsId:"dockerHub",passwordVariable:"dockerpass",usernameVariable:"dockeruser")]){
                    sh "docker login -u ${env.dockeruser} -p ${env.dockerpass}"
                    sh "docker tag nodeapp-test:latest ${env.dockeruser}/nodeapp-test:latest"
                    sh "docker push ${env.dockeruser}/nodeapp-test:latest"
                    echo "image pushed done"

                }
            }
        }
         stage("deploy"){
            steps{
                sh '''
                sudo docker-compose -f /home/ubuntu/nodeapp/docker-compose.yaml down
                sudo docker-compose -f /home/ubuntu/nodeapp/docker-compose.yaml up -d --build
                '''
                echo 'deployment done'
            }
        }
    }
     post {
        success {
            echo 'your pipeline executed successfully'
        }
    }
}
Note: Add docker hub credential in Jenkins Credentials with Username and Password
Step 3:
Once the project is created, click on Save and Build Now to run the project.

Step 4:
Check the console output for the message.

Pipeline Project 3:
Create a Jenkins Declarative Pipeline Using Jenkinsfile for dockerize node js application and keep Jenkinsfile in the GitHub repository
Step 1 :
Log in to your Jenkins dashboard.
Click on "New Item" in the top-left corner.
Enter a name for your project.
Select "Pipeline" and click "OK."
Step 2:
Configure the Pipeline
In the pipeline configuration, scroll down to the "Pipeline" section.
Select the "Pipeline script from SCM" option.
Add Repository URL

Step 3:
Once the project is created, click on Save and Build Now to run the project.

Step 4:
Check the console output for the message.

Pipeline Project 4:
Jenkins Declarative Pipeline with Docker
Using Docker with Pipeline: Create a docker-integrated Jenkins declarative pipeline using the docker groovy syntax inside the stage block.
Many organizations use Docker to unify their build and test environments across machines and to provide an efficient mechanism for deploying applications. Starting with Pipeline versions 2.5 and higher, Pipeline has built-in support for interacting with Docker from within a Jenkinsfile.
This section will cover the basics of utilizing Docker from a Jenkinsfile
To incorporate Docker within the stage block of your Jenkins declarative pipeline, you will need to ensure that both the Docker Pipeline and Docker plugins are installed and configured.
Additionally, you should aim to publish your Docker image to a repository on Docker Hub or another suitable container registry.
Add the below code in the pipeline script.
 pipeline {
     agent any
     stages {
         stage('Build') {
             steps {
                 echo 'container build'
             }
             agent {
                 docker {
                     image 'ishtikhar/nodeapp-test:latest'
                     reuseNode true
                 }
             }
         }
         stage('Deploy') {
             steps {
                 sh 'docker run -d -p 8000:8000 --name nodeapp ishtikhar/nodeapp-test:latest'
             }
         }
     }
 }

Click on Save --> Build Now.

Now we can also see that our container is running in the 8000

How to Setup Jenkins Slave and Add it to Jenkins Master

Jenkins master/slave architecture is used for distributed build environments, where the workload of building projects is distributed to multiple agent nodes, and we can use different environments for each build.
In the Jenkins 'master/slave' architecture, a master represents itself as a basic Jenkins installation and handles all tasks for the build system. The Jenkins master node will be used for scheduling jobs, monitoring slave nodes, dispatching builds to slave nodes, recording and representing the build result, and executing build jobs directly.
The Jenkins slave nodes set up for offload build projects from the master, and it's required an established connection between the master and slaves. Jenkins slave nodes can run on various operating systems like Windows and Linux, and there is no need to install full Jenkins packages on it.
Key Benefits:
Scalability: The architecture scales horizontally by adding more agents, enabling parallel execution of tasks, and reducing overall pipeline duration.
Resource Utilization: Agents make optimal use of hardware resources by constantly engaging in tasks, and minimizing idle periods.
Diverse Environments: Organizations can test their applications on various platforms and configurations, ensuring compatibility and reliability.
Security and Isolation: Communication between the master and agents occurs within the internal network, mitigating external vulnerabilities.
Reliability and Fault Tolerance: If an agent fails, tasks can be rerouted to other available agents, ensuring pipeline continuity.
Step 1: On Master Server
As we already have the master server Jenkins installed, we need to configure the master server itself. By default, there are different ways to start Jenkins agent nodes, we can launch the agent nodes through SSH, a Windows administrative account, and via Java Web Start (JNLP), pick the best way depending on your environment setup and operating system.
here, we will launch the agent nodes through SSH, and we need to set up Jenkins credentials on our master server.
Generate SSH Key: We will be using the SSH key authentication to set up our agent nodes, so we need to generate the SSH key for the Jenkins user and then manually upload the key to each slave server node using 'ssh-copy-id'.
On the Jenkins master server, log in to the Jenkins user and generate the ssh key.
$ sudo su - jenkins
$ ssh-keygen
And you will get the 'id_rsa' private and 'id_rsa.pub' public keys in the '.ssh' directory.
Step 2: Setup Credentials on Jenkins Master GUI
Open your Jenkins dashboard and click on 'Manage Jenkins' then click on Credentials' in Security Configuration.
And click the 'global' domain link.
Now click 'Add Credentials'.

Now choose the authentication method
Kind: SSH Username with private key
Scope: Global
Username: jenkins
Private key: Enter directly and paste the 'id_rsa' private key of the Jenkins user from the master server.
Click 'OK'.
The Jenkins credential with the ssh auth key method has been created.
Step 3: Set up Slave Nodes
Now we will set up the slave node servers by installing Java on those servers and creating a new Jenkins user.
Installation of Java
$ sudo apt update
$ sudo apt install fontconfig openjdk-17-jre
$ java -version
Add New Jenkins User
Now add the 'Jenkins' user to all agent nodes. Run the command below.
$ useradd -m -s /bin/bash jenkins
$ passwd Jenkins
The 'Jenkins' user for agent nodes has been created.
Copy the SSH Key from Master to Slave
Next, we must upload the key 'id_rsa.pub' from the master to slave server nodes. We need to upload to each server node using the 'ssh-copy-id' command as below.
ssh-copy-id jenkins@10.0.15.21
Type the Jenkins user password.
The ssh key 'id_rsa.pub' has been uploaded to all agent nodes.
Step 4: Add Slave Nodes in Jenkins Master GUI
On the Jenkins dashboard, click the 'Manage Jenkins' menu, and click 'Nodes'.
Click the 'New Node'.
Type the node name 'Jenkins-Slave', choose the 'permanent agent', and click 'OK'.
Now type node information details.
Description: slave node agent server
Remote root directory: /home/jenkins
Labels: slave01
Launch method: Launch the slave agent via SSH, type the host IP address of the slave node i.e. '10.0.15.21', and choose the authentication using the 'Jenkins' credential.


Now click the 'Save' button and wait for the master server to connect to all agent nodes and launch the agent services.
Below are the results when the master server is connected to all agent nodes.

The Jenkins slave node has been added to the master server.
To add a Jenkins agent to execute the existing project we will add the label as below.
We have added the label 'slave' of the Jenkins slave node in Restrict where the project can run options.

Post execution of the job, we can see the log as below.

Thank you for reading. I hope you will find this article helpful. if you like it please share it with others
Mohd Ishtikhar Khan : )

