🚀Day 17- Kubernetes for Beginners
🎉 Hello There!!! I am Mohd Ishtikhar Khan, a skilled Cloud & DevOps engineer, having experience in automating various aspects of software development and deployment, including code integration, testing, and deployment processes and Planning and designing the cloud infrastructure in AWS.
⭐️ I thrive in bridging the gap between development and operations teams, with the goal of automating and streamlining the software development and deployment process. As Cloud and DevOps Engineers, we work to improve the speed, efficiency, and quality of software delivery, making it possible to release code faster and more reliably.
Experience in Designing and deploying dynamically scalable, available, fault-tolerant, and reliable applications on the Cloud. Maintenance and support of cloud infrastructure.Implementing cost-control strategies and Troubleshooting and resolving issues with the cloud infrastructure.
Experience in designing solutions that will help customers migrate, operate, deploy, optimize, and execute the DevOps vision of a project and also have a strong passion for technology exploration and development.
I believe that I am somebody with a very strong work ethic because I thrive in challenging environments and I also love building relationships and going out of the way to help a client.
🤝Let's connect! If you're looking to discuss DevOps fundamentals or if you want to share your experience, feel free to reach out to me at mohdishtikhar1786@gmail.com.
What is Kubernetes?
Kubernetes is an open-source container orchestration engine for automating the deployment, scaling, and management of containerized applications. The open-source project is hosted by the Cloud Native Computing Foundation (CNCF).
Kubernetes is a portable, extensible, open-source platform for managing containerized workloads and services, that facilitates both declarative configuration and automation. It has a large, rapidly growing ecosystem. Kubernetes services, support, and tools are widely available.
The term "K8s" is derived from the word "Kubernetes" by taking the first letter, followed by the number 8, and ending with the last letter. This abbreviation is commonly used in the tech community as a shorthand for Kubernetes, making it easier to type and pronounce
Features of Kubernetes
● Continues development, integration, and deployment
● Containerized infrastructure
● Application-centric management
● Auto-scalable infrastructure
● Environment consistency across development testing and production
● Loosely coupled infrastructure, where each component can act as a separate unit
● Higher density of resource utilization
● Predictable infrastructure which is going to be created
Why do you need Kubernetes and what it can do for you?
Containers are a good way to bundle and run your applications. In a production environment, you need to manage the containers that run the applications and ensure that there is no downtime. For example, if a container goes down, another container needs to start. Wouldn't it be easier if this behavior was handled by a system?
That's how Kubernetes comes to the rescue! Kubernetes provides you with a framework to run distributed systems resiliently. It takes care of scaling and failover for your application, provides deployment patterns, and more. For example, Kubernetes can easily manage a canary deployment for your system.
Kubernetes provides you with:
Service discovery and load balancing Kubernetes can expose a container using the DNS name or using their own IP address. If traffic to a container is high, Kubernetes can load balance and distribute the network traffic so that the deployment is stable.
Storage orchestration Kubernetes allows you to automatically mount a storage system of your choice, such as local storage, public cloud providers, and more.
Automated rollouts and rollbacks You can describe the desired state for your deployed containers using Kubernetes, and it can change the actual state to the desired state at a controlled rate. For example, you can automate Kubernetes to create new containers for your deployment, remove existing containers, and adopt all their resources to the new container.
Automatic bin packing You provide Kubernetes with a cluster of nodes that it can use to run containerized tasks. You tell Kubernetes how much CPU and memory (RAM) each container needs. Kubernetes can fit containers onto your nodes to make the best use of your resources.
Self-healing Kubernetes restarts containers that fail, replace containers, kill containers that don't respond to your user-defined health check, and don't advertise them to clients until they are ready to serve.
Secret and configuration management Kubernetes lets you store and manage sensitive information, such as passwords, OAuth tokens, and SSH keys. You can deploy and update secrets and application configuration without rebuilding your container images, and without exposing secrets in your stack configuration.
What are the benefits of using Kubernetes?
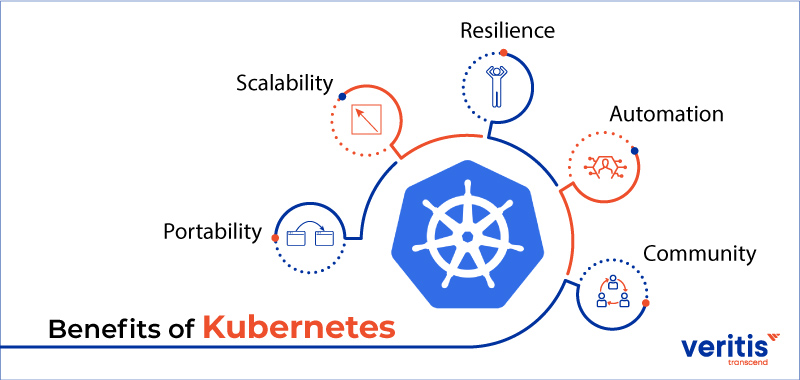
Kubernetes (K8s) has become a widely adopted container orchestration platform, and its popularity is attributed to a variety of benefits it offers for managing containerized applications. Here are some key advantages of using Kubernetes:
Container Orchestration: Kubernetes excels at automating the deployment, scaling, and management of containerized applications. It abstracts the complexity of managing containers, ensuring that applications run consistently across various environments.
Scalability: Kubernetes enables effortless scaling of applications. It can automatically scale the number of application instances based on resource usage or defined metrics, ensuring optimal performance during periods of high demand.
Service Discovery and Load Balancing: Kubernetes provides built-in service discovery and load balancing. Services can be discovered using DNS or environment variables, and load balancing ensures that traffic is distributed evenly across available instances, optimizing application performance.
Rolling Updates and Rollbacks: Kubernetes supports rolling updates, allowing applications to be updated without downtime. If an update causes issues, Kubernetes facilitates easy rollbacks to a previous, stable version, ensuring continuous delivery without disruptions.
Resource Efficiency: Kubernetes optimizes resource utilization by packing containers onto nodes efficiently. It ensures that applications receive the necessary resources while preventing resource wastage, ultimately improving overall infrastructure efficiency.
Declarative Configuration: Kubernetes configurations are defined declaratively, specifying the desired state of the application. This approach allows for version control, easy collaboration, and reproducibility of environments.
Self-healing: Kubernetes continuously monitors the health of applications and automatically restarts containers that fail. It can also replace failed nodes, ensuring high availability and minimizing downtime.
Multi-cloud and Hybrid Cloud Support: Kubernetes is cloud-agnostic, making it easy to deploy and manage applications across different cloud providers or on-premises data centers. This flexibility allows organizations to avoid vendor lock-in and choose the infrastructure that best suits their needs.
Extensibility: Kubernetes is highly extensible through its API and a rich ecosystem of extensions. Users can integrate custom controllers, plugins, or third-party tools to extend and enhance Kubernetes' functionality according to their specific requirements.
Community and Ecosystem: Kubernetes has a vibrant and active open-source community. This ensures regular updates, security patches, and a wealth of resources, including documentation, tutorials, and a vast ecosystem of tools and integrations.
In summary, Kubernetes simplifies the complexities of managing containerized applications, offering scalability, resilience, and automation, making it a powerful choice for modern, cloud-native application deployments.
Alternatives of Kubernetes
Docker Swarm
Apache Mesos
Openshift
Nomad, etc
Monolithic Architecture vs Microservices Architecture
Microservices architecture and monolithic architecture are two contrasting approaches to designing and structuring software applications. Each has its own set of advantages and challenges, and the choice between them often depends on the specific requirements and goals of the project
What is monolithic?
Monolithic architecture is a traditional software design approach where all the components of an application are tightly integrated and combined into a single codebase. In a monolithic application, the entire software is developed, deployed, and maintained as a single unit.
Monolithic Architecture:
Structure:
Single Unit: In a monolithic architecture, the entire application is developed, deployed, and scaled as a single unit.
Tight Integration: Components are tightly integrated, often sharing the same codebase and database.
Development and Deployment:
Simplicity: Easier to develop and deploy since the entire application is contained within a single codebase.
Monolithic Deployment: Deployed as a single unit, and updates typically require the redeployment of the entire application.
Scaling:
- Horizontal Scaling: Scaling involves replicating the entire application on multiple servers (horizontal scaling).
Communication:
- In-Process Communication: Components communicate with each other through in-process method calls.
Technological Homogeneity:
- Uniform Technology Stack: A monolithic application often uses a uniform technology stack throughout.
Testing:
- Easier Testing: Testing can be simpler as the application is a cohesive unit.
Advantages of a monolithic architecture
When developing using a monolithic architecture, the primary advantage is fast development speed due to the simplicity of having an application based on one code base.
The advantages of a monolithic architecture include:
Easy deployment – One executable file or directory makes deployment easier.
Development – When an application is built with one code base, it is easier to develop.
Performance – In a centralized code base and repository, one API can often perform the same function that numerous APIs perform with microservices.
Simplified testing – Since a monolithic application is a single, centralized unit, end-to-end testing can be performed faster than with a distributed application.
Easy debugging – With all code located in one place, it’s easier to follow a request and find an issue.
Disadvantages of a monolithic architecture
monolithic applications can be quite effective until they grow too large and scaling becomes a challenge. Making a small change in a single function requires compiling and testing the entire platform, which goes against the agile approach today’s developers favor.
The disadvantages of a monolith include:
Slower development speed – A large, monolithic application makes development more complex and slower.
Scalability – You can’t scale individual components.
Reliability – If there’s an error in any module, it could affect the entire application’s availability.
The barrier to technology adoption – Any changes in the framework or language affect the entire application, making changes often expensive and time-consuming.
Lack of flexibility – A monolith is constrained by the technologies already used in the monolith.
Deployment – A small change to a monolithic application requires the redeployment of the entire monolith.
What are microservices?
A microservices architecture is a type of application architecture where the application is developed as a collection of services. It provides the framework to develop, deploy, and maintain microservices architecture diagrams and services independently.
Within a microservices architecture, each microservice is a single service built to accommodate an application feature and handle discrete tasks. Each microservice communicates with other services through simple interfaces to solve business problems.
With a microservices architecture, an application is built as independent components that run each application process as a service. These services communicate via a well-defined interface using lightweight APIs. Services are built for business capabilities and each service performs a single function. Because they are independently run, each service can be updated, deployed, and scaled to meet demand for specific functions of an application.
Microservices architectures make applications easier to scale and faster to develop, enabling innovation and accelerating time-to-market for new features.
The microservice architecture enables the rapid, frequent, and reliable delivery of large, complex applications. It also enables an organization to evolve its technology stack.
Characteristics of Microservices :
Autonomous: Each component service in a microservices architecture can be developed, deployed, operated, and scaled without affecting the functioning of other services. Services do not need to share any of their code or implementation with other services. Any communication between individual components happens via well-defined APIs.
Specialized: Each service is designed for a set of capabilities and focuses on solving a specific problem. If developers contribute more code to a service over time and the service becomes complex, it can be broken into smaller services.
Benefits of Microservices :
Agility: Microservices foster an organization of small, independent teams that take ownership of their services. Teams act within a small and well-understood context and are empowered to work more independently and more quickly. This shortens development cycle times. You benefit significantly from the aggregate throughput of the organization.
Flexible Scaling: Microservices allow each service to be independently scaled to meet demand for the application feature it supports. This enables teams to right-size infrastructure needs, accurately measure the cost of a feature, and maintain availability if a service experiences a spike in demand.
Easy Deployment: Microservices enable continuous integration and continuous delivery, making it easy to try out new ideas and to roll back if something doesn’t work. The low cost of failure enables experimentation, makes it easier to update code, and accelerates time-to-market for new features.
Technological Freedom: Microservices architectures don’t follow a “one size fits all” approach. Teams have the freedom to choose the best tool to solve their specific problems. As a consequence, teams building microservices can choose the best tool for each job.
Reusable Code: Dividing software into small, well-defined modules enables teams to use functions for multiple purposes. A service written for a certain function can be used as a building block for another feature. This allows an application to bootstrap itself, as developers can create new capabilities without writing code from scratch.
Resilience: Service independence increases an application’s resistance to failure. In a monolithic architecture, if a single component fails, it can cause the entire application to fail. With microservices, applications handle total service failure by degrading functionality and not crashing the entire application.
Kubernetes Architecture

A Kubernetes cluster consists of a set of worker machines, called nodes, that run containerized applications. Every cluster has at least one worker node.
The worker node(s) host the Pods(Represents a set of running containers in your cluster) that are the components of the application workload. The control plane(The container orchestration layer that exposes API & interface to define, deploy, and manage the lifecycle of containers) manages the worker nodes and the Pods in the cluster. In production environments, the control plane usually runs across multiple computers and a cluster usually runs multiple nodes, providing fault-tolerance and high availability.
Kubernetes Components
The architecture of Kubernetes is divided into two main components:
Control Plane Components
Kubernetes Node Machine Components / Data Node
Control Plane Components(Master Machine Components)
The control plane's components make global decisions about the cluster (for example, scheduling), as well as detecting and responding to cluster events (for example, starting up a new pod when a deployment's replicas field is unsatisfied).
Control plane components can be run on any machine in the cluster. However, for simplicity, set-up scripts typically start all control plane components on the same machine and do not run user containers on this machine. See Creating Highly Available Clusters with Kubeadm for an example control plane setup that runs across multiple machines.
Following are the components of the Kubernetes Master Machine.
kube-apiserver
The API server is a component of the Kubernetes control plane that exposes the Kubernetes API. The API server is the front end for the Kubernetes control plane.
The main implementation of a Kubernetes API server is kube-apiserver. kube-apiserver is designed to scale horizontally—that is, it scales by deploying more instances. You can run several instances of kube-apiserver and balance traffic between those instances.
The users, management devices and command line interfaces all talk to the API server to interact with the Kubernetes cluster.
etcd
Consistent and highly-available key value store used as Kubernetes' backing store for all cluster data. If your Kubernetes cluster uses etcd as its backing store, make sure you have a backup plan for that data.
It stores the configuration information which can be used by each of the nodes in the cluster. It is a high-availability key-value store that can be distributed among multiple nodes. It is accessible only by the Kubernetes API server as it may have some sensitive information. It is a distributed key-value store that is accessible to all.
ETCD is a distributed, reliable key-value store used by Kubernetes to store all data used to manage the cluster. Think of it this way, when you have multiple nodes and multiple masters in your cluster, etcd stores all that information on all the nodes in the cluster in a distributed manner. ETCD is responsible for implementing locks within the cluster to ensure there are no conflicts between the Masters.
kube-scheduler
Control plane component that watches for newly created Pods with no assigned node, and selects a node for them to run on.
Factors taken into account for scheduling decisions include individual and collective resource requirements, hardware/software/policy constraints, affinity and anti-affinity specifications, data locality, inter-workload interference, and deadlines.
This is one of the key components of Kubernetes Master. It is a service in the master responsible for distributing the workload or containers across multiple nodes. It is responsible for tracking the utilization of the working load on cluster nodes and then placing the workload on which resources are available and accepting the workload. In other words, this is the mechanism responsible for allocating pods to available nodes. The scheduler is responsible for workload utilization and allocating pods to a new node. It looks for newly created containers and assigns them to Nodes.
kube-controller-manager
Control plane component that runs controller(A control loop that watches the shared state of the cluster through the apiserver and makes changes attempting to move the current state towards the desired state) processes OR This is a component on the master that runs controllers.
The controller manager runs various controllers that monitor and control the state of different parts of the cluster
Logically, each controller is a separate process, but to reduce complexity, they are all compiled into a single binary and run in a single process.
This component is responsible for most of the collectors that regulate the state of the cluster and performs a task. In general, it can be considered as a daemon that runs in a non-terminating loop and is responsible for collecting and sending information to the API server. It works toward getting the shared state of the cluster and then makes changes to bring the current status of the server to the desired state. The key controllers are the replication controller, endpoint controller, namespace controller, and service account controller. The controller manager runs different kinds of controllers to handle nodes, endpoints, etc.
Some types of these controllers are:
Node controller: Responsible for noticing and responding when nodes go down.
Replication Controller: Responsible for maintaining the correct number of pods for every replication controller object in the system.
Job controller: Watches for Job objects that represent one-off tasks, then creates Pods to run those tasks to completion.
Endpoints controller: Populates the Endpoints object (that is, joins Services & Pods).
Service Account & Token Controllers: Create default accounts and API access tokens for new namespaces.
cloud-controller-manager
A Kubernetes control plane component that embeds cloud-specific control logic. The cloud controller manager lets you link your cluster into your cloud provider's API, and separates out the components that interact with that cloud platform from components that only interact with your cluster.
The cloud-controller-manager only runs controllers that are specific to your cloud provider. If you are running Kubernetes on your own premises, or in a learning environment inside your own PC, the cluster does not have a cloud controller manager.
As with the Kube-controller-manager, the cloud-controller-manager combines several logically independent control loops into a single binary that you run as a single process. You can scale horizontally (run more than one copy) to improve performance or to help tolerate failures.
The Cloud-controller-manager runs controllers that interact with the underlying cloud providers. The cloud-controller-manager binary is an alpha feature introduced in Kubernetes release 1.6. Cloud-controller-manager runs cloud-provider-specific controller loops only. You must disable these controller loops in the Kube-controller-manager. You can disable the controller loops by setting the --cloud-provider flag to external when starting the Kube-controller-manager.
If the cluster is running on a cloud provider's infrastructure, the cloud controller manager interacts with the provider's API to manage resources like load balancers, storage volumes, and instances.
The following controllers can have cloud provider dependencies:
Node controller: For checking the cloud provider to determine if a node has been deleted in the cloud after it stops responding
Route controller: For setting up routes in the underlying cloud infrastructure
Service controller: For creating, updating, and deleting cloud provider load balancers
Volume Controller: For creating, attaching, and mounting volumes, and interacting with the cloud provider to orchestrate volumes.
Kubernetes Node Machine Components
Node components run on every node, maintaining running pods and providing the Kubernetes runtime environment.
kubelet
An agent that runs on each node in the cluster. It makes sure that containers are running in a Pod.
It’s a small service in each node responsible for relaying information to and from the control plane service. It interacts with the etcd store to read configuration details and write values. This communicates with the master component to receive commands and work. The kubelet process then assumes responsibility for maintaining the state of work and the node server. It manages network rules, port forwarding, etc.
The kubelet takes a set of PodSpecs that are provided through various mechanisms and ensures that the containers described in those PodSpecs are running and healthy. The kubelet doesn't manage containers that were not created by Kubernetes.
This is the primary node agent running on each node in the cluster. It gets the configuration of a pod in YAML/JSON format from the apiserver and ensures that the containers described in those configurations are running and in a healthy state. It doesn’t manage containers that were created outside Kubernetes.
kube-proxy
kube-proxy is a network proxy that runs on each node in your cluster, implementing part of the Kubernetes Service(A way to expose an application running on a set of pods as a network service) concept.
kube-proxy maintains network rules on nodes. These network rules allow network communication to your Pods from network sessions inside or outside of your cluster.
kube-proxy uses the operating system packet filtering layer if there is one and it's available. Otherwise, kube-proxy forwards the traffic itself.
This is a proxy service that runs on each node and helps in making services available to the external host. It helps in forwarding the request to the correct containers and is capable of performing primitive load balancing. It makes sure that the networking environment is predictable and accessible and at the same time, it is isolated as well. It manages pods on nodes, volumes, secrets, creating new containers’ health checkups, etc.
Container runtime
The container runtime is the software that is responsible for running containers. Kubernetes supports container runtimes such as containerd, CRI-O, and any other implementation of the Kubernetes CRI (Container Runtime Interface).
The container runtime is the underlying software that is used to run containers. In our case, it happens to be Docker. The container runtime is the software that is responsible for running containers. Kubernetes supports several runtimes: Docker, containerd, cri-o, rktlet, and any implementation of the Kubernetes CRI (Container Runtime Interface).
Kubectl
This is a command line interface that enables you to run commands against Kubernetes cluster(s). Each command that you run with kubectl performs an operation on one or more resources. Examples of resource types are jobs, and nodes.
Docker
The first requirement of each node is Docker which helps in running the encapsulated application containers in a relatively isolated but lightweight operating environment.
What is a Control Plane?
The control plane in Kubernetes is a core architectural component responsible for managing and maintaining the desired state of the entire system. It acts as the brain of the Kubernetes cluster, making decisions about what actions need to be taken to ensure that the current state matches the desired state defined by the user.
The control plane components are responsible for tasks such as scheduling applications, scaling applications, rolling updates, and monitoring the health of both individual containers and the overall cluster. The control plane does not manage the containerized applications directly; instead, it manages the various components that ensure the correct operation of applications across the cluster.
The main components of the control plane include:
API Server:
- The API server is the central management entity that exposes the Kubernetes API. It processes REST operations, validates and configures data, and updates the corresponding objects' state in etcd.
etcd:
- etcd is a distributed key-value store that acts as the cluster's source of truth. It stores configuration data that represents the cluster's state, including information about nodes, pods, services, and more.
Controller Manager:
- The controller manager is responsible for running controller processes, which regulate the state of the system. Controllers are responsible for tasks such as node and pod management, ensuring that the actual state matches the desired state.
Scheduler:
- The scheduler is responsible for placing containers onto nodes in the cluster based on resource requirements, affinity/anti-affinity rules, and other constraints. It ensures optimal resource utilization and distribution of workloads.
Cloud Controller Manager (optional):
- In cloud-based Kubernetes deployments, a cloud controller manager may be present. It interacts with the cloud provider's APIs to manage external resources like load balancers or persistent storage.
When a user interacts with the Kubernetes cluster through the command-line interface (kubectl) or a graphical user interface, they are essentially communicating with the API server. The API server then communicates with etcd to persist the changes and informs the controller manager and scheduler about the necessary actions to maintain the desired state.
In summary, the control plane is a critical component in Kubernetes that manages the orchestration and coordination of containerized applications across the cluster, ensuring that the system operates as intended.
Write the difference between kubectl and kubelets
kubectl: kubectl is a command-line tool used for interacting with the Kubernetes cluster's API server. It allows users to perform various management tasks, such as creating, updating, deleting, and inspecting Kubernetes resources like pods, services, and deployments.
kubelet: kubelet is an agent that runs on each node in the cluster. It communicates with the control plane and is responsible for ensuring that containers within pods are running in a healthy state on its node. It takes care of container lifecycle management, making sure that containers are started, stopped, and monitored as necessary.
kubectl and kubelet are both essential components in a Kubernetes cluster, but they serve different purposes and are used in different contexts. Here are the key differences between kubectl and kubelet:
Functionality:
kubectl: It is the command-line interface (CLI) tool used by administrators and developers to interact with the Kubernetes cluster. It allows users to deploy and manage applications, inspect and manage cluster resources, and troubleshoot issues.
kubectlcommunicates with the Kubernetes API server to execute commands and query the state of the cluster.kubelet: It is an agent that runs on each node in the cluster and is responsible for ensuring that containers are running in a Pod. It receives Pod specifications from the Kubernetes API server and ensures that the containers described in those Pods are running and healthy.
User vs. System Component:
kubectl: It is a user-facing tool used by administrators, developers, and operators to interact with and manage the cluster. Users employ
kubectlto perform various actions on the cluster, such as deploying applications, scaling, and managing resources.kubelet: It is a system component running on each node in the cluster. It operates in the background, managing containers and ensuring their proper execution as per the instructions provided by the Kubernetes control plane.
Usage:
kubectl: Users typically run
kubectlcommands from their local machines or a centralized management server to communicate with the Kubernetes API server.kubelet: It runs on each individual node in the cluster and is responsible for maintaining the state of the containers on that node.
Responsibilities:
kubectl: It is responsible for performing a wide range of actions, including deploying applications, checking cluster status, modifying configurations, and interacting with various resources in the Kubernetes cluster.
kubelet: It primarily focuses on container management on a node. It ensures that the containers specified in Pod manifests are running and, in case of failures, takes corrective actions like restarting containers.
Interactions:
kubectl: Communicates with the Kubernetes API server to execute commands and retrieve information about the state of the cluster.
kubelet: Listens for Pod specifications from the Kubernetes API server and ensures that the containers within those Pods are started and maintained as per the specified configuration.
Explain the role of the API server
The API Server is a central component of the Kubernetes Control Plane (Master) and plays a crucial role in the orchestration and management of a Kubernetes cluster. Its role can be summarized as follows:
1. Entry Point for Cluster Communication:
- The API Server serves as the entry point for communication between users, administrators, applications, and various components of the Kubernetes cluster. It acts as the central interface for issuing commands, making queries, and controlling the cluster.
2. Authentication and Authorization:
- The API Server is responsible for authenticating users and applications that request access to the cluster. It verifies their identity and permissions, ensuring that only authorized actions are allowed within the cluster.
3. Validates and Processes Requests:
- When you use tools like
kubectlor send HTTP requests to the API Server, which validates and processes those requests. It checks the syntax and semantics of incoming requests to ensure they are well-formed and adhere to cluster policies.
4. Maintains Cluster State:
- The API Server interacts with the etcd data store, which is like the cluster's database, to maintain the current state of the cluster. It retrieves configuration data, updates, and overall cluster status from etcd.
5. Exposes the Kubernetes API:
- The API Server exposes the Kubernetes API as a RESTful service. This API allows users and applications to create, modify, or delete Kubernetes resources like pods, services, deployments, and more.
6. Communication Hub:
- It acts as a communication hub within the Control Plane, forwarding requests to the appropriate components, such as the Scheduler and Controller Manager, to perform actions like scaling applications, scheduling workloads, and maintaining desired cluster states.
7. Handles Extensions and Custom Resources:
- Kubernetes can be extended with custom resources and controllers. The API Server manages these extensions, allowing you to define and use custom objects and behaviors in your cluster.
8. Enforces Security Policies:
- Security features like Role-Based Access Control (RBAC) and Network Policies are enforced by the API Server. It ensures that access to resources is controlled according to defined security policies.
In summary, the API Server is the core of the Kubernetes Control Plane. It serves as the primary gateway for cluster communication, ensuring that all actions are secure, well-formed, and consistent with the desired state of the cluster. It plays a pivotal role in making Kubernetes both manageable and secure.
Let's Launch the Minikube Kubernetes Cluster and Deploy an NGINX pod in it
What is Minikube?
Minikube is a tool that quickly sets up a local Kubernetes cluster on macOS, Linux, and Windows. All you need is a Docker (or similarly compatible) container or a Virtual Machine environment, and Kubernetes is a single command away: minikube start
Features of minikube
Supports the latest Kubernetes release (+6 previous minor versions)
Cross-platform (Linux, macOS, Windows)
Deploy as a VM, a container, or on bare-metal
Multiple container runtimes (CRI-O, containerd, docker)
Direct API endpoint for blazing-fast image load and build
Advanced features such as LoadBalancer, filesystem mounts, FeatureGates, and network policy
Addons for easily installed Kubernetes applications
Supports common CI environments
Install Minikube on your local
Pre-Requisite
2 CPUs or more
2GB of free memory
20GB of free disk space
Internet connection
Container or virtual machine manager, such as Docker, QEMU, Hyperkit, Hyper-V, KVM, Parallels, Podman, VirtualBox, or VMware Fusion/Workstation
To install the latest Minikube stable release on x86-64 Linux using binary download
curl -LO https://storage.googleapis.com/minikube/releases/latest/minikube-linux-amd64
sudo install minikube-linux-amd64 /usr/local/bin/minikube
Start Minikube
Now, you can start Minikube with the following command:
minikube start --driver=docker
Check Cluster Status
Check the cluster status with:
minikube status
Create your first pod on Kubernetes through Minikube
Before creating the first pod Let's understand the concept of a pod
What is Pod?
A pod is the smallest deployable unit in Kubernetes. A pod can host one or more containers that share the same network namespace, storage, and context. Containers within a pod can communicate with each other using localhost. Pods are often used to deploy tightly coupled applications or microservices that need to share resources and communicate closely. However, pods are considered relatively ephemeral and can be replaced or rescheduled by Kubernetes
There are two ways you can create an object in Kubernetes
In Kubernetes, you can create objects using two primary methods: imperative and declarative. These methods represent different approaches to defining and managing the state of your cluster. Here's an overview of both
Imperative Approach:
Description:
- In the imperative approach, you directly instruct the Kubernetes system to perform a specific action. You provide explicit commands to create or modify resources without necessarily specifying the desired state in a configuration file.
Example Commands:
  # Create a Pod imperatively
  kubectl run mypod --image=myimage

  # Scale a Deployment imperatively
  kubectl scale deployment mydeployment --replicas=3

   # Expose a Service imperatively
  kubectl expose deploy mydeployment --port=80 --type=LoadBalancer
Pros: - Quick and easy for one-time or ad-hoc operations. - Useful for interactive, exploratory tasks.
Cons: - Commands don't capture the desired state, making it harder to version control or reproduce configurations. - Limited for managing complex and large-scale applications.
Declarative Approach:
Description:
In the declarative approach, you define the desired state of your Kubernetes resources in a configuration file (typically in YAML or JSON format). You then apply this configuration to the cluster using
kubectl applyother similar mechanismsExample Configuration File (Deployment):
yamlapiVersion: apps/v1 kind: Deployment metadata: name: mydeployment spec: replicas: 3 selector: matchLabels: app: myapp template: metadata: labels: app: myapp spec: containers: - name: mycontainer image: myimage ports: - containerPort: 8000Example Usage:
  # Apply the configuration file
  kubectl apply -f deployment.yaml
Pros: - Configuration files serve as a source of truth for the desired state of resources. - Enables versioning, collaboration, and reproducibility of configurations. - Suitable for managing complex and large-scale applications.
Cons: - Slightly more effort initially to create configuration files.
Choosing Between Imperative and Declarative:
Use the imperative approach for quick one-off tasks or interactive exploration.
Use the declarative approach for managing production workloads, enabling version control, and ensuring reproducibility of configurations.
In practice, many Kubernetes users leverage a combination of both approaches based on their specific needs and use cases.
Now Let's create an NGINX pod using imperative and declarative way
Imperative approach :
 # Create a Pod imperatively
 kubectl run nginxpod --image=nginx
Declarative approach :
 # Create a Pod Declaratively
 # vim pod.yaml
 apiVersion: v1
 kind: Pod
 metadata:
   name: nginxpod
   labels:
     app: nginxpod
 spec:
   containers:
     - name: nginx-container
       image: nginx
       ports:
         - containerPort: 80
       resources:
         limits:
           memory: "128Mi"
           cpu: "500m"

  # Apply the configuration file
  kubectl apply -f pod.yaml

 # Verify the Pod Status
 kubectl get pods

 # Access the Nginx Web Server from localhot by port forward method.
 kubectl port-forward nginxpod 8081:80

 # check the pod log
 kubectl logs -f nginxpod

 # To check the logs of the container, specify the container name\
 kubectl logs -f nginxpod -c nginx-container

 # describe pod
 kubectl describe pod nginxpod

 # find pod ip
 kubectl exec nginxpod -c nginx-container -- hostname -i

 # To delete the pod
 kubectl delete pod nginxpod

 # To delete the pod by specifying the manifest file name
 kubectl delete -f pod.yaml
Objects In Kubernetes
1.POD
The smallest deployable unit in Kubernetes is a pod. A pod can host one or more containers that share the same network namespace, storage, and context. Containers in a pod are tightly coupled and often work together as part of a single application.
The containers are encapsulated into a Kubernetes object known as POD.
A POD is a single instance of an application. A POD is the smallest object, that you can create in Kubernetes.PODs usually have a one-to-one relationship with the containers running your application.
Example:- Create a Pod
Imperative approach :
# Create a Pod imperative way
kubectl run nginxpod --image=nginx
Declarative approach :
 # vim pod.yaml
 apiVersion: v1
 kind: Pod
 metadata:
   name: nginxpod
   labels:
     app: nginxpod
 spec:
   containers:
     - name: nginx-container
       image: nginx
       ports:
         - containerPort: 80
       resources:
         limits:
           memory: "128Mi"
           cpu: "500m"

 # Create a Pod Declarative way
 kubectl apply -f pod.yaml
POD With YAML :
Kubernetes uses YAML files as input for the creation of objects such as PODs, Replicas, Deployments, Services, etc.
A Kubernetes definition file always contains 4 top-level fields i.e A.apiVersion B.kind C.metadata & D.spec. These are top-level or root-level properties. Think of them as siblings, children of the same parent. These are all REQUIRED fields, so you MUST have them in your configuration file.
Let us look at each one of them.
A. apiVersion: The first one is the apiVersion. This is the version of the kubernetes API we’re using to create the object. Depending on what we are trying to create we must use the RIGHT apiVersion. For now, since we are working on PODs, we will set the apiVersion as v1. A few other possible values for this field are apps/v1beta1, extensions/v1beta1, etc.
B.kind: The kind refers to the type of object we are trying to create, which in this case happens to be a POD. So we will set it as Pod. Some other possible values here could be ReplicaSet or Deployment or Service.
C.metadata: The metadata is data about the object like its name, labels, etc. As you can see unlike the first two where you specified a string value, this, is in the form of a dictionary. So everything under metadata is intended to the right a little bit and so names and labels are children of metadata. The number of spaces before the two properties' names and labels doesn’t matter, but they should be the same as they are siblings. In this case, labels has more spaces on the left than the name so it is now a child of the name property instead of a sibling. Also the two properties must have MORE spaces than its parent, which is metadata, so that its intended to the right a little bit. In this case all 3 have the same number of spaces before them and so they are all siblings, which is not correct. Under metadata, the name is a string value – so you can name your POD myapp-pod - and the labels is a dictionary. So labels is a dictionary within the metadata dictionary. And it can have any key and value pairs as you wish. For now I have added a label app with the value myapp. Similarly you could add other labels as you see fit which will help you identify these objects at a later point in time. Say for example there are 100s of PODs running a front-end application, and 100’s of them running a backend application or a database, it will be DIFFICULT for you to group these PODs once they are deployed. If you label them now as front-end, back-end or database, you will be able to filter the PODs based on this label at a later point in time.It’s IMPORTANT to note that under metadata, you can only specify name or labels or anything else that kubernetes expects to be under metadata. You CANNOT add any other property as you wish under this. However, under labels you CAN have any kind of key or value pairs as you see fit. So its IMPORTANT to understand what each of these parameters expect.
D.spec: Depending on the object we are going to create, this is where we provide additional information to Kubernetes pertaining to that object. This is going to be different for different objects, so its important to understand or refer to the documentation section to get the right format for each. Since we are only creating a pod with a single container in it, it is easy. Spec is a dictionary so add a property under it called containers, which is a list or an array. The reason this property is a list is because the PODs can have multiple containers within them as we learned in the lecture earlier. In this case though, we will only add a single item in the list, since we plan to have only a single container in the POD. The item in the list is a dictionary, so add a name and image property. The value for image is nginx.Once the file is created, run the command kubectl create -f followed by the file name which is pod-definition.yml and kubernetes creates the pod. So to summarize remember the 4 top level properties. apiVersion, kind, metadata and spec. Then start by adding values to those depending on the object you are creating.

2.ReplicaSet
A ReplicaSet ensures that the specified number of replicas (identical copies) of a pod are running at all times. It's often used to guarantee the availability and scalability of pods. However, ReplicaSets are relatively low-level and don't support rolling updates or rollbacks directly.
Let us now create a replica set definition yaml file
# vim replicaset-definition.yaml
apiVersion: apps/v1
kind: ReplicaSet
metadata:
  name: myrs
  labels:
     app: myrs
     type: frontend
spec:
  template:
    metadata:
        name: mypod
        labels:
            app: mypod
            type: frontend
    spec:
        containers:
         - name: nginx-container
           image: nginx
  replicas: 2
  selector:
    matchLabels:
      type: frontend

# Create a Pod imperative way from yaml file
kubectl create -f replicaset-definition.yaml

# Create a Pod declarative way from yaml file
kubectl apply -f replicaset-definition.yaml
Description - Let us now look at ReplicaSet. As usual, first, we have apiVersion, kind, metadata, and spec. The apiVersion though is a bit different. It is apps/v1. The kind would be ReplicaSet and we add names and labels in metadata. The specification section looks very similar to the replication controller. It has a template section where we provide pod definition as before. The selector section helps the replicaset identify what pods fall under it. But why would you have to specify what PODs fall under it if you have provided the contents of the pod-definition file itself in the template? It’s BECAUSE replica sets can ALSO manage pods that were not created as part of the replica set creation. Say for example, there were pods created BEFORE the creation of the ReplicaSet that match the labels specified in the selector, the replica set will also consider THOSE pods when creating the replicas. In the case of the replica set a user input is required for this property. It has to be written in the form of matchLabels as shown in the above definition file. The matchLabels selector simply matches the labels specified under it to the labels on the PODs. The replica set selector also provides many other options for matching labels that were not available in a replication controller.
Scaling ReplicaSet :
There are many ways to scale replicaset pods some of them are given below
1. The first, is to update the number of replicas in the definition file to the number you want and run the below command
# kubectl replace -f replicaset-definition.yaml
2. The second way to do it is to run the kubectl scale command as given below
# kubectl scale --replicas=6 -f replicaset-definition.yaml
3. directly scale the no. of replicas using the below command providing the name of the replicaset
# kubectl scale --replicas=6 replicaset myrs --- here replicaset is type and myrs is the name of replicaset
Note:
if you are creating a new pod that has the same labels that replica set has then it wont allow you to create that pod bcos the desired no. of pods is already running and created by the replica set.
However, Remember that using the file name as input will not result in the number of replicas being updated automatically in the file. In other words, the number of replicas in the replica set-definition file will still be 3 even though you scaled your replica set to have 6 replicas using the kubectl scale command and the file as input.
3.Deployment
A deployment is a higher-level abstraction in Kubernetes that manages the lifecycle and scaling of a set of pods. Deployments are used to ensure that a desired number of replica pods are always running, and they handle updates and rollbacks seamlessly. Deployments also provide declarative configuration, which means you define the desired state of your application, and Kubernetes works to maintain that state
The deployment provides us with capabilities to upgrade the underlying pod instances seamlessly using rolling updates, undo changes, and pause and resume changes to deployments
Let us now create a Deployment definition yaml file
# vim deployment-definition.yaml
apiVersion: apps/v1
kind: Deployment
metadata:
  name: mydeployment
  labels:
   app: mydeployment
   type: frontend
spec:
 template:
   metadata:
     name: mypod
     labels:
       app: mypod
       type: frontend
   spec:
      containers:
       - name: redis-container
         image: redis
 replicas: 2
 selector:
   matchLabels:
      type: frontend


# Create a Pod imperative way from yaml file
kubectl create -f deployment-definition.yaml

# Create a Pod declarative way from yaml file
kubectl apply -f deployment-definition.yaml
The contents of the deployment-definition file are exactly similar to the replicaset definition file, except for the kind, which is now going to be Deployment.The deployment automatically creates a replica set and The replicasets ultimately create pods So far there hasn’t been much of a difference between replicaset and deployments, except for the fact that deployments created a new kubernetes object called deployments
Deployment - Updates and Rollback
Rollout and Versioning

Let’s try to understand Rollouts and Versioning in a deployment. Whenever you create a new deployment or upgrade the images in an existing deployment it triggers a Rollout. A rollout is the process of gradually deploying or upgrading your application containers. When you first create a deployment, it triggers a rollout. A new rollout creates a new Deployment revision. Let’s call it revision 1. In the future when the application is upgraded – meaning when the container version is updated to a new one – a new rollout is triggered and a new deployment revision is created named Revision 2. This helps us keep track of the changes made to our deployment and enables us to rollback to a previous version of deployment if necessary.
Rollout Command
You can see the status of your rollout by running the command: kubectl rollout status followed by the name of the deployment.
# kubectl rollout status deployment/myapp-deployment
To see the revisions and history of rollout run the command kubectl rollout history followed by the deployment name and this will show you the revisions
# kubectl rollout history deployment/myapp-deployment
Deployment Strategy
There are two types of deployment strategies: A.recreate B.rollout

1. Recreate: Say for example you have 5 replicas of your web application instance deployed. One way to upgrade these to a newer version is to destroy all of these and then create newer versions of application instances. This means that first, destroy the 5 running instances and then deploy 5 new instances of the new application version. The problem with this as you can imagine, is that during the period after the older versions are down and before any newer version is up, the application is down and inaccessible to users. This strategy is known as the Recreate strategy, and thankfully this is NOT the default deployment strategy
2. Rollout: The second strategy is where we do not destroy all of them at once. Instead, we take down the older version and bring up a newer version one by one. This way the application never goes down and the upgrade is seamless. Remember, if you do not specify a strategy while creating the deployment, it will assume it to be Rolling Update. In other words, RollingUpdate is the default Deployment Strategy.
Note: The difference between the recreate and rolling-update strategies can also be seen when you view the deployments in detail. Run the Kubectl describe deployment command to see detailed information regarding the deployments. You will notice when the Recreate strategy was used the events indicate that the old replicaset was scaled down to 0 first and the new replica set scaled up to 5. However, when the RollingUpdate strategy was used the old replica set was scaled down one at a time simultaneously scaling up the new replica set one at a time.
Upgrades Application Deployment

Let's talk about application upgrades. When we say update it could be different things such as updating your application version by updating the version of docker containers used, updating their labels or updating the number of replicas etc. Since we already have a deployment definition file it is easy for us to modify this file. Once we make the necessary changes, we run the kubectl apply command to apply the changes. A new rollout is triggered and a new revision of the deployment is created.
Upgrades after changing in yaml file using kubectl command :
kubectl apply -f deployment-definition.yaml But there is ANOTHER way to do the same thing. You could use the kubectl set image command to update the image of your application. But remember, doing it this way will result in the deployment-definition file having a different configuration. So you must be careful when using the same definition file to make changes in the future. for e.g kubectl set image deployment mydeployment nginx=nginx:1.9.1
Let’s look at how a deployment performs an upgrade under the hoods. When a new deployment is created, say to deploy 5 replicas, it first creates a Replicaset automatically, which in turn creates the number of PODs required to meet the number of replicas. When you upgrade your application as we saw in the previous slide, the kubernetes deployment object creates a NEW replicaset under the hoods and starts deploying the containers there. At the same time taking down the PODs in the old replica-set following a RollingUpdate strategy. This can be seen when you try to list the replicasets using the kubectl get replicasets command. Here we see the old replicaset with 0 PODs and the new replicaset with 5 PODs.
Rollback

Say for instance once you upgrade your application, you realize something isn’t very right. Something’s wrong with the new version of build you used to upgrade. So you would like to rollback your update. Kubernetes deployments allow you to rollback to a previous revision. To undo a change run the command kubectl rollout undo followed by the name of the deployment. The deployment will then destroy the PODs in the new replicaset and bring the older ones up in the old replicaset. And your application is back to its older format. When you compare the output of the kubectl get replicasets command, before and after the rollback, you will be able to notice this difference. Before the rollback the first replicaset had 0 PODs and the new replicaset had 5 PODs and this is reversed after the rollback is finished.

4.Service

Kubernetes Services enable communication between various components within and outside of the application. Kubernetes Services helps us connect applications with other applications or users. For example, our application has groups of PODs running various sections, such as a group for serving front-end load to users, another group running back-end processes, and a third group connecting to an external data source. It is Services that enable connectivity between these groups of PODs. Services enable the front-end application to be made available to users, it help communication between back-end and front-end PODs, and help in establishing connectivity to an external data source. Thus services enable loose coupling between microservices in our application.
In Kubernetes, a "Service" is an abstraction that provides a way to expose a set of pods as a network service. Services enable communication between various components within the cluster, as well as external clients. Services are a fundamental building block for networking in Kubernetes, and they play a crucial role in enabling microservices architectures and load balancing.
Types of Services:
ClusterIP: The default service type, provides a stable internal IP to access pods within the same cluster.
NodePort: Exposes the service on a static port on each node's IP, making it accessible externally.
LoadBalancer: Automatically provisions an external load balancer (if supported by the cloud provider) to expose the service externally.
ExternalName: Maps the service to a DNS name, allowing pods to access external services using that name.
Headless: Similar to ClusterIP but with no load balancing or proxying, useful for StatefulSets.
1.Service - NodePort

NodePort service makes an internal POD accessible on a Port on the Node. It helps us by mapping a port on the Node to a port on the POD.
Let’s take a closer look at the Service. If you look at it, there are 3 ports involved. The port on the POD where the actual web server is running is port 80. And it is referred to as the targetPort because that is where the service forwards the requests to. The second port is the port on the service itself. It is simply referred to as the port. Remember, these terms are from the viewpoint of the service. The service is in fact like a virtual server inside the node. Inside the cluster, it has its IP address. And that IP address is called the Cluster-IP of the service. And finally, we have the port on the Node itself which we use to access the web server externally. And that is known as the NodePort. As you can see it is 30008. That is because NodePorts can only be in a valid range which is from 30000 to 32767.
To create a service run the below command
# Lets create a nodeport service in a imperative way
kubectl expose pod nginxpod --type=NodePort --port=80 --name=nginx-service

# Lets create a nodeport service definition yaml file
# vim NodePort.yaml
apiVersion: v1
kind: Service
metadata:
  name: mysvc
spec:
  type: NodePort
  ports:
    - port: 80
      targetPort: 80
      nodePort: 30008
  selector:
    app: nginxpod

# Create a NodePort Service in a declarative way
kubectl apply -f NodePort.yaml
2.Service - ClusterIP

1.A full stack web application typically has different kinds of PODs hosting different parts of an application. You may have a number of PODs running a front-end web server, another set of PODs running a backend server, a set of PODs running a key-value store like Redis, another set of PODs running a persistent database like MySQL etc. The web front-end servers need to connect to the backend-workers and the backend-workers need to connect to database as well as the redis services. So what is the right way to establish connectivity between these PODs?
2.The PODs all have an IP address assigned to them as we can see on the screen. But these Ips as we know are not static, these PODs can go down anytime and new PODs are created all the time – and so you CANNOT rely on these IP addresses for internal communication within the application. Also what if the first front-end POD at 10.244.0.3 need to connect to a backend service? Which of the 3 would it go to and who makes that decision?
3.A kubernetes service can help us group these PODs together and provide a single interface to access the PODs in a group. For example a service created for the backend PODs will help group all the backend PODs together and provide a single interface for other PODs to access this service. The requests are forwarded to one of the PODs under the service randomly. Similarly, create additional services for Redis and allow the backend PODs to access the redis system through this service. This enables us to easily and effectively deploy a microservices based application on kubernetes cluster. Each layer can now scale or move as required without impacting communication between the various services. Each service gets an IP and name assigned to it inside the cluster and that is the name that should be used by other PODs to access the service. This type of service is known as ClusterIP.
To create a service run the below command
# Lets create a clusterip service in a imperative way
kubectl expose pod nginxpod --port=80 --name=nginx-service

# Lets create a clusterip service definition yaml file
# vim clusetrip.yaml
apiVersion: v1
kind: Service
metadata:
  name: mysvc
spec:
  type: ClusterIP
  ports:
    - port: 80
      targetPort: 80
  selector:
    app: nginxpod

# Create a ClusterIP Service in a declarative way
kubectl apply -f clusterip.yaml
Note: ClusterIP is the default type, so even if you didn’t specify it, it will automatically assume it to be ClusterIP
3. Service - LoadBalancer

When creating a Service, you have the option of automatically creating a cloud load balancer. This provides an externally accessible IP address that sends traffic to the correct port on your cluster nodes, provided your cluster runs in a supported environment and is configured with the correct cloud load balancer provider package.
To create a service run the below command
# Lets create a loadbalancer service in a imperative way
kubectl expose pod nginxpod --type=LoadBalancer --port=80 --name=nginx-service

# Lets create a loadbalancer service definition yaml file
# vim lb.yaml
apiVersion: v1
kind: Service
metadata:
  name: elbsvc
spec:
  type: LoadBalancer
  ports:
    - port: 80
      targetPort: 80
  selector:
    app: nginxpod

# Create a loadbalancer Service in a declarative way
kubectl apply -f lb.yaml
5.Namespaces
Kubernetes uses namespaces to create a logical separation between different environments or projects within a cluster. Pods are created within specific namespaces to help manage and isolate resources
In Kubernetes, you can create your own namespace to isolate resources from the default namespace. For example, if you want to use the same cluster for both the dev and production environment but at the same time isolate the resources between them you can create a different namespace for each of them. That way while working in the dev environment you don't accidentally modify a resource in the production
Each of these namespace can have its own set of policies that define who can do what. You can also assign a quota of resources to each of these namespaces each namespace is guaranteed a certain amount and does not use more than it's allowed.
The resources within a namespace can refer to each other simply by their names. In this case, the web app pod can reach the DB service simply using the hostname db service if required. The Web app Pod can reach a service in another namespace as well.
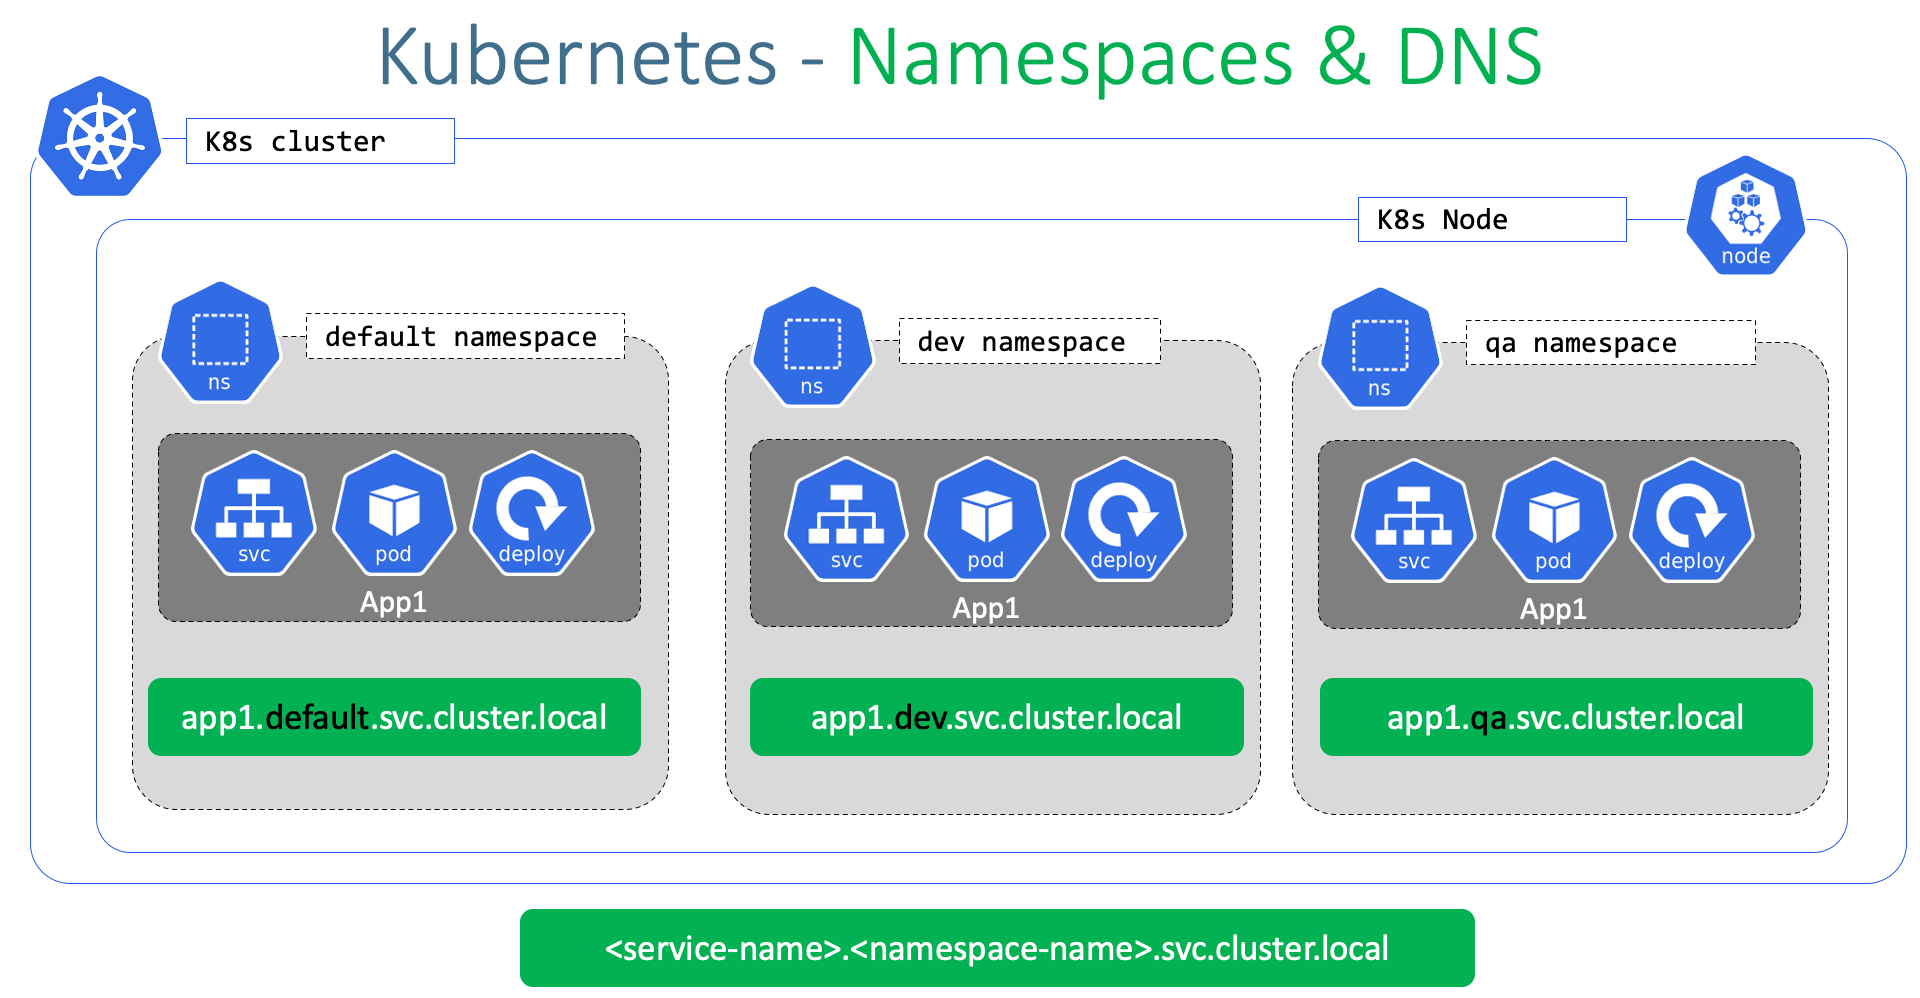
For this, you must append the name of the namespace to the name of the service. For example for the web pod in the default namespace to connect to the database in the dev environment or namespace. Use the servicename.namespace.svc. cluster.local format that would be dbservice.dev.svc.cluster.local you're able to do this because when the service is created a DNS entry is added automatically in this format looking closely at the DNS name of the service.
The last part Cluster.local is the default domain name of the kubernetes cluster SVC is the subdomain for the service followed by the namespace and then the name of the service itself.
To create a namespace run the below command
# imperative command to create namespace
kubectl create namespace dev

# namespace.yaml
apiVersion: v1
kind: Namespace
metadata:
  name: dev
# declarative way to create namespace
kubectl apply -f namespace.yaml
Note: If you don't specify the namespace in the command line you can move the namespace definition into the pod definition file like this under the metadata section. This is a good way to ensure your resources are always created in the same namespace.
For example
# vim pod-definition.yml
apiVersion: v1
kind: Pod
metadata:
    name: myapp-pod
    namespace: dev
    labels:
        app: myapp
        type: front-end
spec:
    containers:
    - name: nginx-container
      image: nginx
Whenever we run kubectl get command we have to specify the specific namespace to view its resources but we want to see the resources of a specific namespace without entering namespace parameters as we do for the default namespace Well, in that case, use the Kube control config command to set the namespace in the current context. the command for the same is given below
kubectl config set-context $(kubectl config current-context) --namespace=dev
Resource Quota - limit resources in a namespace. Start with a definition file for resource quota specify the namespace for which you want to create the quota and then under spec provide your limits such as 10 pods 10 CPU units 10 GB bytes of memory

# vim Compute-quota.yaml
apiVersion: v1
kind: ResourceQuota
metadata:
    name: compute-quota
    namespace: dev
spec:
    hard:
     pods: “10"
     requests.cpu: “4"
     requests.memory: 5Gi
     limits.cpu: “10"
     limits.memory: 10Gi

kubectl create –f compute-quota.yaml
How Kubectl Apply Command Work:
1.The kubectl apply Command takes into consideration the local configuration file, the live object definition on Kubernetes and the last applied configuration before making a decision on what changes are to be made. So when you run the apply command, if the object does not already exist, the object is created.
When the object is created.An object configuration similar to what we created locally is created within Kubernetes, but with additional fields to store status of the object. This is the live configuration of the object on the Kubernetes cluster. This is how Kubernetes internally stores information about an object, no matter what approach you use to create the object.
2.But when you use the kubectl apply command to create an object, it does something a bit more.The YAML version of the local object configuration file we wrote is converted to a JSON format and it is then stored as the last applied configuration going forward for any updates to the object.All the three are compared to identify what changes are to be made on the live object.
3.For example, say when the engine x image is updated to 1.19 in our local file and we run the apply command.This value is compared with the value in the live configuration and if there is a difference, the live configuration is updated with the new value.After any change, the last applied JSON format is always updated to the latest so that it's always up to date. So why do we then really need the last applied configuration?Right.
4.So if a field was deleted, say, for example, the type label was deleted. And now when we run the command, we see that the last applied configuration had a label, but it's not present in the local configuration.This means that the field needs to be removed from the live configuration.So if a field was present in the live configuration and not present in the local or the last applied configuration, then it will be left as is. But if a field is missing from the local file and it is present in the last applied configuration, so that means that in the previous step or whenever the last time we ran the applied command, that particular field was there and it is now being removed. So the last applied configuration helps us figure out. What field? Fields have been removed from the local file.Right.So that field is then removed from the actual live configuration.
5.So we saw the three sets of files and we know that the local file is what stored on our local system.The live object configuration is in the Kubernetes memory, but where is this JSON file that has the last applied configuration stored? Well, it's stored on the live object configuration on the Kubernetes cluster itself as an annotation named Last Applied Configuration.
6.So remember that this is only done when you use the API command.The code will create or replace commands do not store the last applied configuration like this. So you must bear in mind not to mix the imperative and declarative approaches while managing the Kubernetes objects. So once you use the applied command going forward, whenever a change is made, the apply command compares all three sections the local pod definition file, the live object configuration and the last applied configuration stored within the live object configuration file for deciding what changes are to be made to the live configuration.
Below I have mentioned some common issues, their reasons, and how to solve them!
𝐏𝐨𝐝𝐬 𝐍𝐨𝐭 𝐒𝐭𝐚𝐫𝐭𝐢𝐧𝐠
Cause: Insufficient resources or image errors.
Solution: Check resource limits and ensure the correct image name and tag.
𝐒𝐞𝐫𝐯𝐢𝐜𝐞 𝐍𝐨𝐭 𝐀𝐜𝐜𝐞𝐬𝐬𝐢𝐛𝐥𝐞
Cause: Misconfigured service or network policies.
Solution: Verify service configuration and check network policies.
𝐏𝐞𝐫𝐬𝐢𝐬𝐭𝐞𝐧𝐭 𝐕𝐨𝐥𝐮𝐦𝐞 𝐂𝐥𝐚𝐢𝐦 𝐈𝐬𝐬𝐮𝐞𝐬
Cause: Insufficient storage or access modes mismatch.
Solution: Ensure adequate storage and match PVC and PV access modes.
𝐂𝐨𝐧𝐟𝐢𝐠𝐌𝐚𝐩 𝐊𝐞𝐲 𝐍𝐨𝐭 𝐅𝐨𝐮𝐧𝐝
Cause: Missing key in ConfigMap.
Solution: Add the missing key to the ConfigMap.
𝐂𝐫𝐚𝐬𝐡𝐋𝐨𝐨𝐩𝐁𝐚𝐜𝐤𝐎𝐟𝐟 𝐒𝐭𝐚𝐭𝐮𝐬
Cause: Application crashes or liveness probe failure.
Solution: Check application logs and adjust liveness probe settings.
𝐈𝐦𝐚𝐠𝐞𝐏𝐮𝐥𝐥𝐁𝐚𝐜𝐤𝐎𝐟𝐟 𝐄𝐫𝐫𝐨𝐫
Cause: Private image without credentials or wrong image name.
Solution: Provide image pull secrets and verify image name and tag.
𝐍𝐨𝐝𝐞 𝐍𝐨𝐭 𝐑𝐞𝐚𝐝𝐲
Cause: Network issues or disk pressure.
Solution: Check node network connectivity and free up disk space.
𝐅𝐚𝐢𝐥𝐞𝐝 𝐒𝐜𝐡𝐞𝐝𝐮𝐥𝐢𝐧𝐠
Cause: Taints and tolerations mismatch or insufficient resources.
Solution: Adjust taints and tolerations, and ensure resource availability.
𝐑𝐁𝐀𝐂 𝐀𝐮𝐭𝐡𝐨𝐫𝐢𝐳𝐚𝐭𝐢𝐨𝐧 𝐄𝐫𝐫𝐨𝐫𝐬
Cause: Incorrect role bindings or missing permissions.
Solution: Review and correct role bindings, and add necessary permissions.
𝐈𝐧𝐠𝐫𝐞𝐬𝐬 𝐂𝐨𝐧𝐭𝐫𝐨𝐥𝐥𝐞𝐫 𝐈𝐬𝐬𝐮𝐞𝐬
Cause: Misconfigured ingress or SSL/TLS problems.
Solution: Verify ingress configuration and check SSL/TLS certificates.
🔧 Remember, Kubernetes is powerful but can be tricky. Keeping these solutions in mind can save you time and headaches.
Have you encountered these issues? How did you resolve them? Share your experiences below!


