🚀Day 11- Docker Fundamental: A Comprehensive Guide

🎉 Hello There!!! I am Mohd Ishtikhar Khan, a skilled Cloud & DevOps engineer, having experience in automating various aspects of software development and deployment, including code integration, testing, and deployment processes and Planning and designing the cloud infrastructure in AWS.
⭐️ I thrive in bridging the gap between development and operations teams, with the goal of automating and streamlining the software development and deployment process. As Cloud and DevOps Engineers, we work to improve the speed, efficiency, and quality of software delivery, making it possible to release code faster and more reliably.
Experience in Designing and deploying dynamically scalable, available, fault-tolerant, and reliable applications on the Cloud. Maintenance and support of cloud infrastructure.Implementing cost-control strategies and Troubleshooting and resolving issues with the cloud infrastructure.
Experience in designing solutions that will help customers migrate, operate, deploy, optimize, and execute the DevOps vision of a project and also have a strong passion for technology exploration and development.
I believe that I am somebody with a very strong work ethic because I thrive in challenging environments and I also love building relationships and going out of the way to help a client.
🤝Let's connect! If you're looking to discuss DevOps fundamentals or if you want to share your experience, feel free to reach out to me at mohdishtikhar1786@gmail.com.
What is Virtualization?
Virtualization is a technology that allows multiple operating systems or applications to run on a single physical server or host. It provides a layer of abstraction between the hardware and the operating system, enabling more efficient use of resources, isolation, and flexibility. Before diving into containerization, it's essential to understand the concept of virtualization. One form of virtualization is operating system-level virtualization.
Operating System-Level Virtualization
Operating system-level virtualization, also known as containerization, is a lightweight form of virtualization that virtualizes the operating system (OS) rather than the hardware. In this model, a single OS instance is divided into multiple isolated user-space instances, commonly known as containers. Each container operates as an independent environment, running its own processes and applications.
Key characteristics of operating system-level virtualization include:
Shared OS Kernel:
- Containers share the host operating system's kernel. This means they can be more lightweight compared to traditional virtual machines because they don't need a full OS stack.
Isolation:
- Containers provide a level of isolation between applications or services running in different containers. They encapsulate the application and its dependencies, ensuring that changes or issues in one container do not affect others.
Resource Efficiency:
- Containers are highly efficient in terms of resource utilization. Since they share the host OS, there is less overhead compared to running multiple full virtual machines.
Rapid Deployment:
- Containers can be started and stopped quickly, enabling rapid deployment and scaling of applications. This is particularly beneficial in dynamic and scalable environments.
Portability:
- Containers encapsulate the application and its dependencies, making them highly portable across different environments. This portability is a key feature for modern, cloud-native applications.
Easier Management:
- Container orchestration tools, such as Kubernetes and Docker Swarm, simplify the deployment, scaling, and management of containerized applications across clusters of hosts.
Popular containerization platforms like Docker have popularized the use of operating system-level virtualization. Containers have become a fundamental building block for modern application development and deployment.
Understanding operating system-level virtualization provides a foundation for comprehending the principles and benefits of containerization, which takes the concept of lightweight, isolated environments to the next level. Containerization has become a cornerstone in the development of microservices, DevOps practices, and cloud-native applications.
What is Docker?
In the world of modern software development and IT operations, Docker has emerged as a game-changer. Docker containers offer a way to package applications and all their dependencies into a single unit, making it easier to develop, deploy, and manage software across different environments.
Docker is a computer program that performs OS-level virtualization also known as containerization.
It's an open platform for developers & sysadmins to build, ship & run distributed applications whether on a laptop, data center medium vm, or on the cloud.
Docker is a software platform that enables you to create, deploy, and run applications in isolated environments called containers. Containers are lightweight and portable packages that include all the dependencies required for an application to run, such as code, libraries, and system tools
Docker makes it easy to create and manage these containers, which can be run on any system that supports Docker, regardless of the underlying operating system or hardware
Docker helps you to develop, test, and deploy applications consistently and reliably, without worrying about compatibility issues or conflicts with other software on the host system.
Docker has become an industry standard for containerization, with a large and active community of developers and users, and is widely used by organizations to build and deploy modern, cloud-native applications.
Benefits of Using Docker
Fast & Consistency: Docker containers ensure that your application runs the same way on your local machine as it does in production, eliminating the "it works on my machine" problem.
Complete Isolation: Containers are isolated environments that don't interfere with each other, preventing conflicts between different applications and their dependencies.
Portability: Docker containers can be easily moved between different environments, making it simple to migrate applications from development to testing to production.
Resource Efficiency: Containers are lightweight and share the host OS kernel, making them highly resource-efficient compared to traditional virtual machines.
Scalability: Docker makes it easy to scale applications by creating multiple instances of containers, all running the same application code.
What are containers?
It is running an instance of the docker image. Containers are completely isolated environments, as in they can have their own processes or services, their own network interfaces, and their own mounts, just like Virtual machines, except that they all share the same OS kernel. But it's also important to note that containers are not new to Docker. Containers have existed for about 10 years now and some of the different types of containers are LXC, LXD, LXCFS etc. Docker utilizes LXC containers.
What is a Docker image?
Docker images are the building blocks of containers. An image is a lightweight, standalone, and executable package that includes everything needed to run a piece of software, including the code, runtime, libraries, and system tools.
Containers vs Virtual Machines

Docker
In the case of Docker, we have the underlying hardware infrastructure, then the OS, and Docker installed on the OS. Docker then manages the containers that run with libraries and dependencies alone.
This allows docker containers to boot up faster, usually in a matter of seconds whereas VMs we know take minutes to boot up as they need to boot up the entire OS.
It is also important to note that, Docker has less isolation as more resources are shared between containers like the kernel
Virtual Machine
In the case of a Virtual Machine, we have the OS on the underlying hardware, then the Hypervisor like an ESX or virtualization of some kind, and then the virtual machines. As you can see each virtual machine has its own OS inside it, then the dependencies, and then the application
This overhead causes higher utilization of underlying resources as there are multiple virtual operating systems and kernel running. The virtual machines also consume higher disk space as each VM is heavy and is usually in Giga Bytes in size, whereas docker containers are lightweight and are usually in MegaBytes in size
Whereas VMs are completely isolated from each other. Since VMs don’t rely on the underlying OS or kernel, you can run different types of OS such as Linux or Windows based on the same hypervisor
Docker Engine
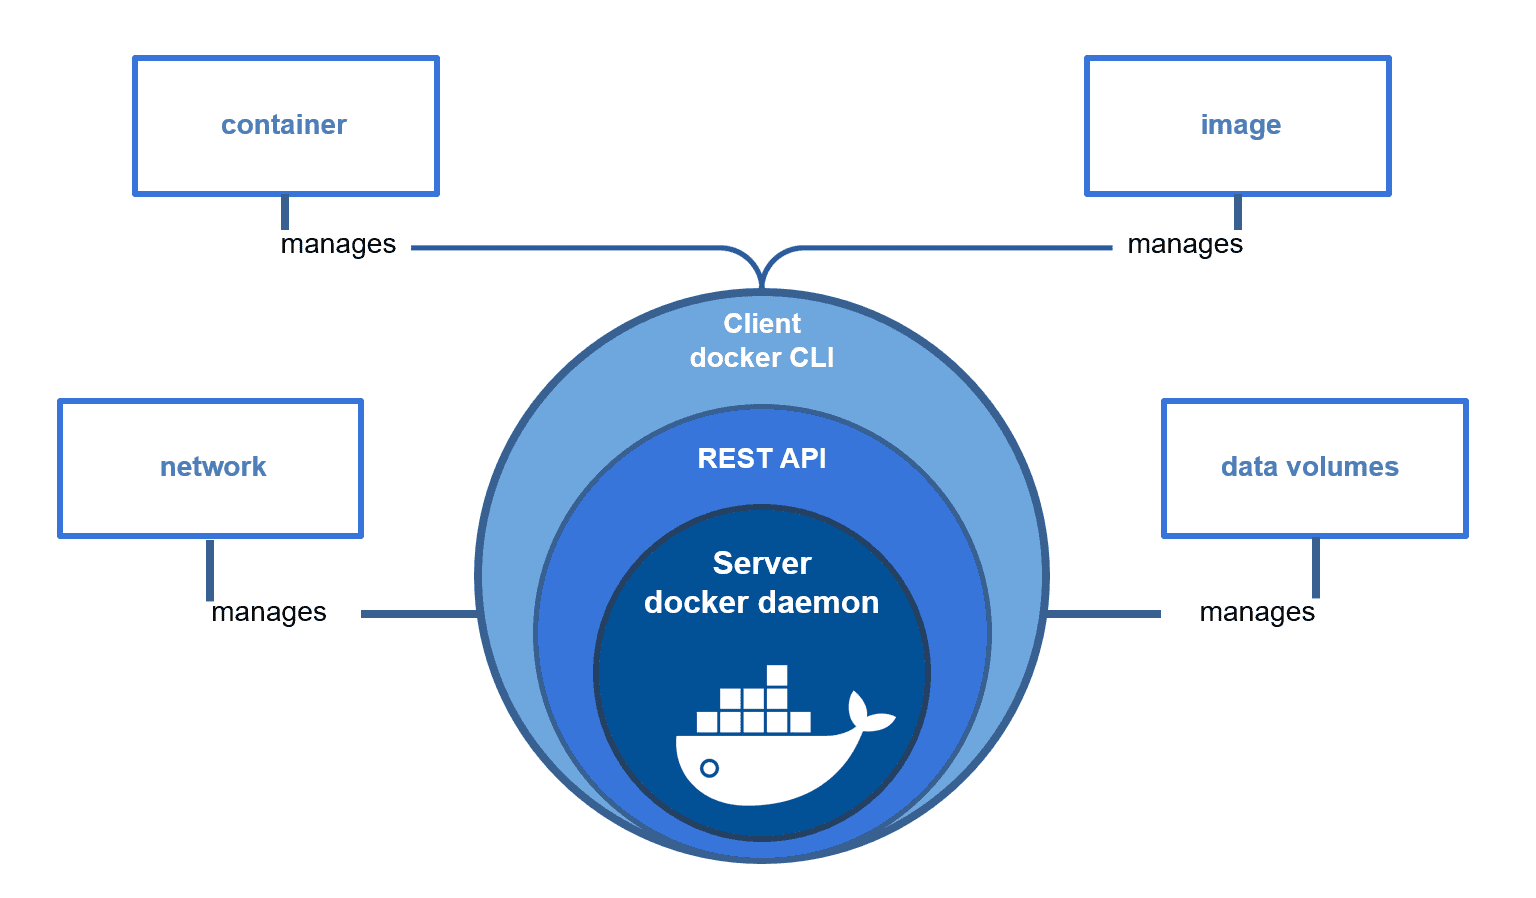
The Docker engine is a client-server application with these major components:-
Server / Docker Daemon: A server is a long-running program called a daemon process (dockerd)
Rest API: A Rest API specifies the interfaces that programs can use to talk to the docker daemon and instruct it what to do.
Command Line Interface(CLI): The cli uses docker rest API to control or interact with the docker daemon through scripting or direct cli commands. the docker daemon creates and manages docker objects such as images, containers, networks, and volumes.
Docker Architecture
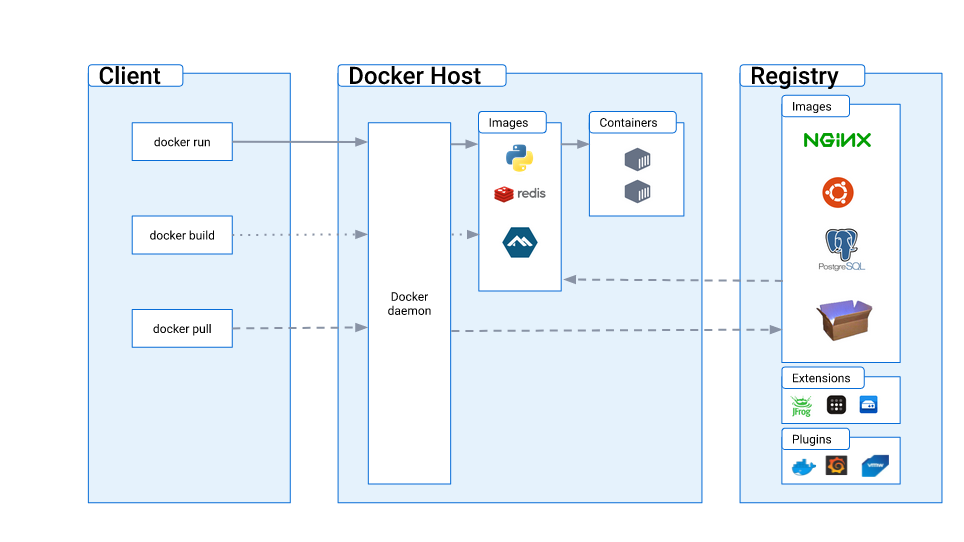
The Docker client talks to the Docker daemon which does the heavy lifting of building, running, and distributing your Docker containers. The Docker client & Docker daemon can run on the same system or you can connect a Docker client to a remote Docker daemon. The Docker client and docker daemon communicate using REST API over a Unix socket or network interface.
Docker uses a client-server architecture that consists of three main components:
Docker Client: The Docker client is a command-line interface (CLI) tool that allows you to interact with the Docker daemon. You can use the Docker client to build, run, manage, and distribute Docker containers.
Docker Daemon: The Docker daemon is a background process that runs on the Docker host. It listens for API requests and manages docker objects such as images, containers, networks, and volumes. The Docker daemon is responsible for managing Docker containers, including creating, running, stopping, and destroying containers. The Docker daemon also communicates with other Docker daemons to manage Docker services.
Docker Registry: The Docker registry is a public or private repository where Docker images are stored. The Docker is configured to look for images on the Docker hub by default. you can even run your own private registry. when you use the docker pull or docker push command the required images are pulled from your configured registry.
Docker Object: When you are working with docker you use images, containers, networks, and volumes all these are docker objects.
Docker Images: A Docker image is a read-only template that contains the instructions for creating a Docker container. A Docker image can include an operating system, application code, and other dependencies.
Docker Containers: A Docker container is a running instance of a Docker image. A Docker container is isolated from other containers and from the host system. This isolation makes it possible to run multiple containers on a single host without worrying about conflicts.
Docker Volume: Docker containers use the host system's storage to store their data. Docker also supports volumes, which are persistent storage volumes that can be shared between containers.
Docker Networking: Docker containers can communicate with each other using Docker networking. Docker networking is based on the Linux network namespaces. There are mainly 5 network drivers in docker listed below:
Bridge: It is a default network driver for a container. you can use this network when your application is running on a standalone container i.e. multiple containers communicate with the same docker host.
Host: This driver removes the isolation between the docker containers and the host. it is used when you don't need any network isolation between host and container.
Overlay: This network enables docker swarm services to communicate with each other. it is used when containers are running on different docker hosts or when swarm services are formed by multiple container applications.
None: This network driver disables the networking.
Macvlan: This network driver assigns Mac addresses to containers to make them look like physical addresses. the traffic is routed between containers through their Mac addresses. this network is used when you want the containers to look like a physical device for example while migrating a vm setup.
Let's delve into executing some Docker commands to further enhance our understanding
docker run: Use thedocker runcommand to start a new container and interact with it through the command line.# docker run [OPTIONS] IMAGE [COMMAND] [ARG...] $ docker run hello-worlddocker inspect: Use thedocker inspectcommand to view detailed information about a container, or image, or volume.#docker inspect [OPTIONS] NAME|ID [NAME|ID...] $ docker inspect hello-worlddocker port: Use thedocker portcommand to list the port mappings for a container.$ docker port <containerid or name>docker stats: Use thedocker statscommand to view resource usage statistics for one or more containers.$ docker statsdocker top: Use thedocker topcommand to view the processes running inside a container.$ docker top <containerid or name>docker save: Use thedocker savecommand to save an image to a tar archive.#docker save [OPTIONS] IMAGE [IMAGE...] docker save -o test_image.tar testdocker load: Use thedocker loadcommand to load an image from a tar archive.$ docker load -i test_image.tar
What is Dockerfile?
A Dockerfile is a script or configuration file used to build a Docker image. It contains a set of instructions that Docker uses to automatically create an image of an application or service along with its dependencies. Dockerfiles are a fundamental component of Docker's approach to containerization, enabling the consistent and reproducible creation of container images.
OR
A Dockerfile is a text file that contains instructions for building a Docker image.
The instructions in a Dockerfile tell Docker how to create a containerized application.
Dockerfile instructions include things like copying files, running commands, and setting environment variables.
Once a Dockerfile is created, it can be used to build a Docker image using the
docker buildcommand.The Docker image created from a Dockerfile can be used to create and run Docker containers on any machine that supports Docker.

Why should we use the Dockerfile?
Reproducibility:
- Dockerfiles provide a consistent and reproducible way to build Docker images. With a Dockerfile, you can document all the steps and dependencies required to set up an environment, ensuring that anyone who builds the image gets the same result.
Automation:
- Dockerfiles enable automation of the image-building process. Instead of manually setting up an environment or copying files into a container, you can script these actions in a Dockerfile. This automation is valuable for continuous integration (CI) and continuous deployment (CD) pipelines.
Consistency Across Environments:
- Dockerfiles help maintain consistency between development, testing, and production environments. Developers can work in containers that mirror the production environment, reducing the chances of "it works on my machine" issues.
Versioning and History:
- Dockerfiles provide a version-controlled history of how an image is constructed. Each instruction in the Dockerfile represents a layer, and by inspecting the Dockerfile, you can understand how the image is built at different stages.
Ease of Collaboration:
- Dockerfiles make it easy for teams to collaborate on projects. By sharing the Dockerfile along with the source code, team members can contribute to the development process without worrying about the intricacies of setting up the development environment.
Portability:
- Dockerfiles contribute to the portability of applications. With a Dockerfile, you can define an application's dependencies and configurations in a way that is independent of the host environment. This portability is a key feature for modern, cloud-native applications.
Efficient Resource Utilization:
- Docker images built from Dockerfiles are generally more efficient in terms of size and resource utilization. Docker uses a layered file system, and each instruction in a Dockerfile represents a new layer. Reusing layers from cached builds makes the build process faster and images smaller.
Security:
- Dockerfiles provide an opportunity to implement security best practices. You can explicitly define which files and dependencies are included in the image, reducing the attack surface. Additionally, it allows you to follow security guidelines for the base image and avoid unnecessary installations.
Easier Maintenance:
- Dockerfiles make it easier to maintain and update applications. When dependencies change or security patches are released, updating the Dockerfile and rebuilding the image is a more controlled and straightforward process compared to updating a running container.
Integration with Orchestration Tools:
- Dockerfiles are integral to container orchestration tools like Kubernetes and Docker Swarm. These tools rely on Docker images, and Dockerfiles define the content and behavior of those images.
Here are some of the most commonly used commands in a Dockerfile
FROM: The base image for building a new image. This command must be on top.MAINTAINER: It contains the name of the maintainer of the image.RUN: Used to execute command during the build process of docker image. For example, you might use theRUNcommand to install necessary packages or dependencies for your application.ADD: Used to Copy files from and directories from the host machine to the docker image. you can also use this command to download files and folders from from URL. Docker will download the file to the destination directory and if a file is a tar archive then it is automatically unpacked into the docker image.COPY: Similar to the add command but the source can only be a local file or directory.ENV: Sets an environment variable in the image.CMD: It is used to specify the default command and arguments that should be executed when a container is started.CMDis the default set of arguments that are supplied to the ENTRYPOINT process.ENTRYPOINT: It is used to specify the main command that should be executed when a container is started using the image. The default ENTRYPOINT command is/bin/sh -c.EXPOSE: Specifies the ports that should be exposed on the container.WORKDIR: Sets the current working directory within the container.USER: Sets the user that the container process runs as.VOLUME: Creates a mount point for a volume. enable to mount a host machine directory to the containerARG- This instruction allows you to define variables that can be passed at build time. you can also set a default value/LABEL: Used to add metadata to images such as description, version, and author
Build Docker Image
$ docker build -t "imagename" .
or
$ docker build -t "username/imagename:tag" .

Where -t specifies the imagename optionally username and tag
Note: If both ENTRYPOINT and CMD are specified in a Dockerfile, the command specified in CMD will be appended to the ENTRYPOINT command. It acts as an argument for ENTRYPOINT. The resulting command will be executed when the container is started.
Note: To exclude files and directories from being added to the image create a .dockerignore file in the context directory. the syntax of dockerignore file is similar to one of the git's git ignore files.
Difference Between CMD and ENTRYPOINT
CMD
It is used to specify the default command and arguments that should be executed when a container is started.
CMDis the default set of arguments that are supplied to the ENTRYPOINT process.CMDset the default commands or arguments which can be overwritten from the command line when the docker container run
ENTRYPOINT
ENTRYPOINTspecifies the command that will always be executed when the container starts.The default
ENTRYPOINTcommand is/bin/sh -cyou can't override an
ENTRYPOINTwith when starting the container unless you use --entrypoint flag
Note: Docker ENTRYPOINT & CMD have 2 Forms - 1. Shell Form 2. Exec Form
Shell Form
 syntax
 <instruction> <command>
 e.g. CMD echo "ehhlo"
      ENTRYPOINT echo "ehhlo"
Exec Form
 syntax
 <instruction> ["executable", "parameters"]
 e.g. CMD ["echo" "ehhlo"]
      ENTRYPOINT ["echo", "ehhlo"]
Dockerfile Examples
- Example of a Dockerfile for a Node.js application:
# Use an official Node.js runtime as the base image
FROM node:14

# Set the working directory in the container
WORKDIR /app

# Copy package.json and package-lock.json to the container
COPY package*.json ./

# Install application dependencies
RUN npm install

# Copy the rest of the application code to the container
COPY . /app

# Expose a port that the application will listen on
EXPOSE 3000

# Define the command to run the application
CMD [ "npm", "start" ]
To build an image from a Dockerfile, use the docker build command. For example, if your Dockerfile is in the current directory, run:
docker build -t "node-app" .
This command builds an image tagged as "node-app" from the current directory's Dockerfile.
With this custom image created, you can run containers from it just like you did with the pre-built images.
# To run the container
docker run -d -p 3000:3000 node-app
- Example of a Dockerfile for a Node.js application:
# Use an official Python runtime as the base image
FROM python:3

WORKDIR /app

# Copy the rest of the application code
COPY . /app

RUN pip install django==3.2

# Install the required packages
RUN python manage.py migrate

# Define the command to run the application
CMD ["python", "manage.py", "runserver", "0.0.0.0:8000"]
To build an image from a Dockerfile, use the docker build command. For example, if your Dockerfile is in the current directory, run:
docker build -t "python-app" .
This command builds an image tagged as "python-app" from the current directory's Dockerfile.
With this custom image created, you can run containers from it just like you did with the pre-built images.
# To run the container
docker run -d -p 8000:8000 python-app
How to Reduce Docker Image Size (Best Practices)
Your Docker image size matters for reasons such as:
Faster deployments time to download, transfer, and load into the container runtime, and improved team productivity and application performance.
Better storage utilization on your machine.
Reduced network bandwidth when transferring between hosts and container orchestration environments.
Reducing image size and removing unnecessary files eliminate vulnerable components that expose images to security issues.
Build and portability efficiency speeds up the build processes and improves resource usage.
Looking to optimize your Docker images and improve the performance of your applications? Here are some techniques that can help you create smaller and more efficient images:
𝟭. 𝗨𝘀𝗲 𝗮 𝘀𝗺𝗮𝗹𝗹𝗲𝗿 𝗯𝗮𝘀𝗲 𝗶𝗺𝗮𝗴𝗲: Instead of using a full-featured Linux distribution as the base image, try using a minimalistic one, such as Alpine Linux or BusyBox.
For example, instead of using the Ubuntu image, you can use the Alpine image, which is smaller and more lightweight.
FROM alpine:latest
RUN apk add --no-cache python3
CMD ["python3", "-m", "http.server", "8000"]
𝟮. 𝗨𝘀𝗲 𝗺𝘂𝗹𝘁𝗶-𝘀𝘁𝗮𝗴𝗲 𝗯𝘂𝗶𝗹𝗱𝘀: Separate the build environment from the runtime environment using multi-stage builds to reduce the size of the final image.
Multi-stage builds allow you to use multiple FROM statements in your Dockerfile, each of which can have its own set of build instructions. The final image will only include the final stage, which can help reduce the size of the image.
With multi-stage builds, you can create a Dockerfile with multiple stages, each of which creates a temporary image. Each stage can be used to build and compile your application or perform other tasks, such as running tests. In the final stage, you copy the compiled application from the previous stages into a new image, resulting in a much smaller and more efficient final image.
# Stage 1: Build the application
FROM node:14-alpine AS build
WORKDIR /app
COPY package*.json ./
RUN npm install
COPY . .
RUN npm run build

# Stage 2: Create the final image
FROM node:14-alpine
WORKDIR /app
COPY --from=build /app/dist ./dist
COPY package*.json ./
RUN npm install --only=production
EXPOSE 3000
CMD ["npm", "start"]
Here, the first stage builds the application using node:14-alpine as the base image. It installs dependencies, copies the source code, and runs the build script. The resulting artifacts are saved in the /app/dist directory.
In the second stage, we create a new image using node:14-alpine as the base image. We copy the compiled artifacts from the previous stage into the new image, install production dependencies, and set the command to start the application.
By using multi-stage builds, we can reduce the size of the final image by only including the necessary files and dependencies. This can result in significant image size reductions and improved performance.
𝟯. 𝗠𝗶𝗻𝗶𝗺𝗶𝘇𝗲 𝘁𝗵𝗲 𝗻𝘂𝗺𝗯𝗲𝗿 𝗼𝗳 𝗹𝗮𝘆𝗲𝗿𝘀: Chain commands together or use the "&&" operator to run multiple commands in a single layer to minimize the number of layers in your Dockerfile.
Docker images are composed of layers, and each layer contains a specific set of changes to the image. By using Docker image layers, you can avoid including unnecessary files and directories in your Docker image, which can help reduce the image size. Each instruction in a Dockerfile creates a new layer in the final image. By carefully ordering instructions and minimizing the number of layers, you can reduce the size of the final image.
For example, instead of copying all files at once, you can copy files in stages, which results in multiple layers.
# Base image
FROM node:14-alpine

# Set working directory
WORKDIR /app

# Install dependencies
COPY package*.json ./
RUN npm install

# Copy source code
COPY . .

# Build application
RUN npm run build

# Remove development dependencies
RUN npm prune --production

# Set command to start an application
CMD ["npm", "start"]
This is an example of a Dockerfile that demonstrates how to use image layers to reduce the size of a Node.js application.
In this example, we start with a base image of node:14-alpine. We then set the working directory and install dependencies using the npm install command. This creates a new image layer.
We then copy the source code into the image and build the application using the npm run build command. This creates another image layer.
After building the application, we remove the development dependencies using the npm prune --production command. This removes unnecessary packages from the image and reduces its size.
Finally, we set the command to start the application using the CMD instruction.
By carefully ordering instructions and minimizing the number of layers, we can create a Docker image that is both small and efficient.
𝟰. 𝗥𝗲𝗺𝗼𝘃𝗲 𝘂𝗻𝗻𝗲𝗰𝗲𝘀𝘀𝗮𝗿𝘆 𝗳𝗶𝗹𝗲𝘀: Remove files that are not needed in the image, such as log files, temporary files, and cache files.
When building a Docker image, it’s important to only include the files and directories that are necessary for the application to run. Any extraneous files or directories can add unnecessary bloat to the image, which can slow down the deployment and increase resource usage.
One way to remove unnecessary files is to use the COPY command with the --exclude option in your Dockerfile. This allows you to copy only the files and directories that are required for the application to run while excluding any unnecessary files or directories.
𝟱. 𝗨𝘀𝗲 𝗮 .𝗱𝗼𝗰𝗸𝗲𝗿𝗶𝗴𝗻𝗼𝗿𝗲 𝗳𝗶𝗹𝗲: Create a .dockerignore file to exclude files and directories that are not needed in the image, such as development files, documentation, and test data.
The .dockerignore file is used to exclude files and directories from being included in the Docker build context. By ignoring unnecessary files and directories, you can reduce the size of the build context, which in turn can help reduce the size of the Docker image.
# Ignore .git directory
.git

# Ignore node_modules directory
node_modules

# Ignore log files
*.log
𝟲. 𝗢𝗽𝘁𝗶𝗺𝗶𝘇𝗲 𝘁𝗵𝗲 𝗮𝗽𝗽𝗹𝗶𝗰𝗮𝘁𝗶𝗼𝗻 𝗰𝗼𝗱𝗲: Optimize the application code to reduce its size, such as removing unused code, minimizing dependencies, and using smaller libraries.
7. Compress files and directories: To reduce the size of a Docker image, compress the files and directories before copying them into the image. This can be done using a compression utility such as gzip or tar.
Here’s an example of how to use the tar command to compress the application files and directories, and then copy the compressed archive into the Docker image
FROM node:14-alpine
WORKDIR /app

# Compress the application files and directories using 'tar' and 'gzip'
RUN tar -czf app.tar.gz .

# Copy the compressed archive into the Docker image and extract it
COPY app.tar.gz .
RUN tar -xzf app.tar.gz && rm app.tar.gz

# Install dependencies and start the application
RUN npm install
CMD ["npm", "start"]
8.Use Docker layer caching: When building Docker images, Docker caches each layer of the image, so that if a layer has not changed since the last build, it can be reused rather than rebuilt. This can greatly speed up the build process and reduce the overall size of the resulting image.
To use Docker layer caching, it is important to structure the Dockerfile in such a way that the layers that change the most frequently are placed later in the build process. This allows Docker to reuse the earlier layers if they have not changed.
FROM python:3.8-alpine

# Install dependencies
RUN apk update && apk add --no-cache gcc musl-dev libffi-dev openssl-dev

# Set the working directory
WORKDIR /app

# Install Python dependencies
COPY requirements.txt .
RUN pip install --no-cache-dir -r requirements.txt

# Copy application code
COPY . .

# Expose the application port
EXPOSE 5000

# Start the application
CMD [ "python", "app.py" ]
In this example, the Dockerfile starts with a base image of Python 3.8 on Alpine Linux. The first instruction installs some system-level dependencies that are needed for the Python dependencies to be installed. The next instruction sets the working directory for the image, followed by the installation of Python dependencies. Next, the application code is copied into the image, and the application port is exposed. Finally, the command to start the application is defined.
By structuring the Dockerfile in this way, the layers that change the most frequently (i.e., the application code) are placed towards the end of the build process, allowing Docker to reuse the earlier layers if they have not changed. This can greatly reduce the time it takes to build the Docker image, as well as the overall size of the resulting image.
\============================================================
In conclusion, Docker has emerged as a transformative tool for DevOps engineers, revolutionizing software development, testing, and deployment practices. Its containerization technology encapsulates applications and their dependencies, ensuring consistency across various environments and eliminating the "it works on my machine" issue.
DevOps engineers leverage Docker to streamline the development-to-production pipeline, fostering collaboration, accelerating delivery, and improving software quality. The capability to package applications into portable containers facilitates seamless deployment on any infrastructure, from local development machines to cloud servers.
Thank you for reading. I hope you will find this article helpful. if you like it please share it with others
Mohd Ishtikhar Khan : )

